「DreamBoothをWindowsで簡単に試したい」
「Stable Diffusion v2で簡単に高精度のファインチューニングを実行したい」
このような場合には、ShivamShrirao版DreamBoothがオススメです。
この記事では、WindowsでDreamBoothを動かすための方法を解説しています。
本記事の内容
- ShivamShrirao版DreamBoothとは?
- ShivamShrirao版DreamBoothのシステム要件
- ShivamShrirao版DreamBoothのインストール
- ShivamShrirao版DreamBoothの動作確認
それでは、上記に沿って解説していきます。
ShivamShrirao版DreamBooth
DreamBoothについては、次の記事で説明しています。

上記記事では、ShivamShrirao版とは異なるJoePenna版を利用していました。
このJoePenna版は、GPUメモリを24GB必要としています。
JoePenna版を利用していた理由は、その時点ではJoePenna版だけがWindowsで動いたからです。
おそらく、ShivamShrirao版が動かなかったのはxFormersが原因だと思います。
その時点では、WindowsにxFormersをインストールするのが困難な状況でした。
そのことから、JoePenna版を頑張って利用していました。
しかし、2022年12月現在ではShivamShrirao版がWindowsでも簡単に利用できます。
その理由は、後述しています。
また、ShivamShrirao版はStable Diffusion v2に対応しています。
ただ、モデルはstabilityai/stable-diffusion-2-baseが対象です。
したがって、解像度512 x 512のサポートまでと言うことになります。
まあ、そのうち768 x 768にも対応するでしょう。
以上、ShivamShrirao版DreamBoothについて説明しました。
次は、ShivamShrirao版DreamBoothのシステム要件を説明します。
ShivamShrirao版DreamBoothのシステム要件
ShivamShrirao版DreamBoothのシステム要件は、次のモノがあります。
- OS
- Pythonバージョン
- GPUメモリ(VRAM)
- PyTorch
- その他のライブラリ
それぞれを以下で説明します。
OS
サポートOSに関しては、以下だろうという推測しかできません。
- Windows
- Linux
macOSについては、xFormersのインストールが厳しいと思われます。
ここがクリアできれば、macOSでも動くのではないでしょうか?
Pythonバージョン
Pythonのバージョンは、以下のPython公式開発サイクルに従いましょう。
| バージョン | リリース日 | サポート期限 |
| 3.7 | 2018年6月27日 | 2023年6月27日 |
| 3.8 | 2019年10月14日 | 2024年10月 |
| 3.9 | 2020年10月5日 | 2025年10月 |
| 3.10 | 2021年10月4日 | 2026年10月 |
| 3.11 | 2022年10月25日 | 2027年10月 |
オススメするのは、Python 3.10です。
Python 3.10を推奨する理由は、後ほど説明します。
GPUメモリ(VRAM)
基本的には、DreamBoothは40GBのGPUメモリが必要です。
しかし、改善に改善を重ねて10GBを切るようにまでなっています。
公式ページでは、9.92GBが最低ラインとなります。
メモリと速度に関するデータが、公開されています。
train_batch_sizeとgradient_accumulation_stepを「1」とした場合のデータです。
fp16 | gradient_checkpointing | use_8bit_adam | GB VRAM usage | Speed (it/s) |
|---|---|---|---|---|
| fp16 | TRUE | TRUE | 9.92 | 0.93 |
| no | TRUE | TRUE | 10.08 | 0.42 |
| fp16 | FALSE | TRUE | 11.17 | 1.14 |
| no | FALSE | TRUE | 11.17 | 0.49 |
| fp16 | TRUE | FALSE | 15.79 | 0.77 |
これを見ると、8GBのGPUは不可となります。
しかし、DeepSpeedを利用すると8GBのGPUでも学習が可能のようです。
DeepSpeedについては、私の環境では利用する必要がありません。
そのため、まだ試したことがない状況です。
PyTorch
PyTorchは、事前にインストールしておきましょう。
GPU版PyTorchのみが、サポート対象です。

その他のライブラリ
以下のライブラリも事前にインストールしておきます。
- Diffusers
- Scipy
- xFormers
それぞれのライブラリは、次の記事で説明しています。

xFormersのインストールは、Windowsではなかなかハードです。
そのことを上記の記事で解説しています。
ただ、Python 3.10であれば簡単にインストール可能です。
その理由も記事内で説明しています。
Windowsを対象にした場合は、次のコマンドで紹介したライブラリをインストールできます。
pip install diffusers
pip install scipy
pip install xformers-0.0.14.dev0-cp310-cp310-win_amd64.whl
以上、ShivamShrirao版DreamBoothのシステム要件を説明しました。
次は、ShivamShrirao版DreamBoothのインストールを説明します。
ShivamShrirao版DreamBoothのインストール
まず、GitHubからリポジトリをクローンします。
git clone https://github.com/ShivamShrirao/diffusers.git
ダウンロードが完了したら、次のディレクトリまで移動します。
cd .\diffusers\examples\dreambooth\
基本的には、この場所で処理を行います。
インストールは、用意されているrequirements.txtを利用します。
requirements.txt
accelerate==0.12.0
torchvision
transformers>=4.21.0
ftfy
tensorboard
modelcards
PyTorchは既にインストール済みです。
そのため、PyTorch関連を除外します。
次のようにコメントアウトにしてもOK。
#torchvision
requirements.txtを修正したら、次のコマンドを実行します。
pip install -r requirements.txt
インストールは、それほど時間がかからず終了するでしょう。
以上、ShivamShrirao版DreamBoothのインストールを説明しました。
次は、ShivamShrirao版DreamBoothの動作確認を説明します。
ShivamShrirao版DreamBoothの動作確認
動作確認を行う前に、Accelerateの設定を行う必要があります。
Accelerateについては、次の記事で説明しています。

「accelerate test」で次の結果を得られたら、動作確認へ進みましょう。
Test is a success! You are ready for your distributed training!
動作確認を行うためには、事前に準備が必要です。
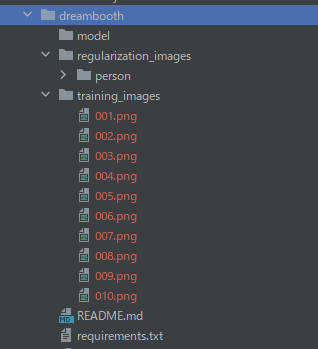
まずは、諸々を保存する場所を作成します。
mkdir model
mkdir regularization_images
mkdir training_images
上記を実行すると、次のようにディレクトリが作成されます。
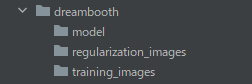
各ディレクトリの役割は、以下となります。
| ディレクトリ名 | 保存データ |
| model | 学習したモデル |
| regularization_images | 正則化画像 |
| training_images | 学習画像 |
正則化画像は、学習画像と同じように分類される画像が好ましいとされています。
例えば、人の顔を学習画像にする場合は人の画像を正則化画像に用いるということです。
とりあえず、ここでは「person」を利用します。
「person」は、次のページでNitrosocke氏が公開してくれている画像です。
https://drive.google.com/drive/folders/19pI70Ilfs0zwz1yYx-Pu8Q9vlOr9975M
Nitrosocke氏は、Hugging Faceで多くのモデルを公開しています。
https://huggingface.co/nitrosocke
また、学習画像は自分でなんとか集めましょう。
10枚ほど集めれば、動作確認は可能です。
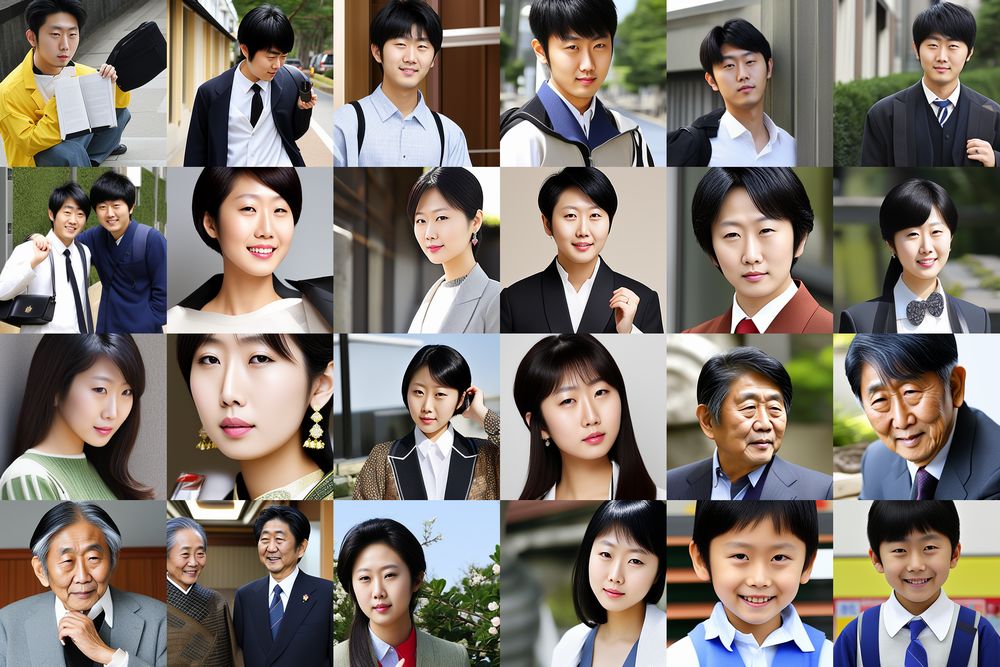
今回は、フリー素材で有名な人の顔画像を10枚用意しました。
ここまで準備ができたら、次のコマンドで学習を実施します。
accelerate launch train_dreambooth.py `
  --class_data_dir=./regularization_images/person `
  --pretrained_model_name_or_path="stabilityai/stable-diffusion-2-base" `
  --instance_data_dir=./training_images `
  --output_dir=./model `
  --instance_prompt "free_sozai_man person" `
  --class_prompt "person" `
  --resolution=512 `
  --train_batch_size=1 `
  --gradient_accumulation_steps=1 `
  --learning_rate=1e-6 `
  --lr_scheduler constant `
  --lr_warmup_steps=0 `
  --max_train_steps=400 `
  --with_prior_preservation --prior_loss_weight=1.0 `
  --gradient_checkpointing
モデルが、「stabilityai/stable-diffusion-2-base」であることに要注意です。
今回は、512 x 512のモデルをベースにします。
各オプションの意味は、ヘルプで確認できます。
> accelerate launch train_dreambooth.py -h
usage: train_dreambooth.py [-h] --pretrained_model_name_or_path PRETRAINED_MODEL_NAME_OR_PATH [--revision REVISION] [--tokenizer_name TOKENIZER_NAME] --instance_data_dir INSTANCE_DATA_DIR
                           [--class_data_dir CLASS_DATA_DIR] --instance_prompt INSTANCE_PROMPT [--class_prompt CLASS_PROMPT] [--with_prior_preservation] [--prior_loss_weight PRIOR_LOSS_WEIGHT]
                           [--num_class_images NUM_CLASS_IMAGES] [--output_dir OUTPUT_DIR] [--seed SEED] [--resolution RESOLUTION] [--center_crop] [--train_text_encoder]
                           [--train_batch_size TRAIN_BATCH_SIZE] [--sample_batch_size SAMPLE_BATCH_SIZE] [--num_train_epochs NUM_TRAIN_EPOCHS] [--max_train_steps MAX_TRAIN_STEPS]
                           [--save_steps SAVE_STEPS] [--gradient_accumulation_steps GRADIENT_ACCUMULATION_STEPS] [--gradient_checkpointing] [--learning_rate LEARNING_RATE] [--scale_lr]
                           [--lr_scheduler LR_SCHEDULER] [--lr_warmup_steps LR_WARMUP_STEPS] [--use_8bit_adam] [--adam_beta1 ADAM_BETA1] [--adam_beta2 ADAM_BETA2]
                           [--adam_weight_decay ADAM_WEIGHT_DECAY] [--adam_epsilon ADAM_EPSILON] [--max_grad_norm MAX_GRAD_NORM] [--push_to_hub] [--hub_token HUB_TOKEN]
                           [--hub_model_id HUB_MODEL_ID] [--logging_dir LOGGING_DIR] [--mixed_precision {no,fp16,bf16}] [--local_rank LOCAL_RANK]

Simple example of a training script.

options:
  -h, --help            show this help message and exit
  --pretrained_model_name_or_path PRETRAINED_MODEL_NAME_OR_PATH
                        Path to pretrained model or model identifier from huggingface.co/models.
  --revision REVISION   Revision of pretrained model identifier from huggingface.co/models.
  --tokenizer_name TOKENIZER_NAME
                        Pretrained tokenizer name or path if not the same as model_name
  --instance_data_dir INSTANCE_DATA_DIR
                        A folder containing the training data of instance images.
  --class_data_dir CLASS_DATA_DIR
                        A folder containing the training data of class images.
  --instance_prompt INSTANCE_PROMPT
                        The prompt with identifier specifying the instance
  --class_prompt CLASS_PROMPT
                        The prompt to specify images in the same class as provided instance images.
  --with_prior_preservation
                        Flag to add prior preservation loss.
  --prior_loss_weight PRIOR_LOSS_WEIGHT
                        The weight of prior preservation loss.
  --num_class_images NUM_CLASS_IMAGES
                        Minimal class images for prior preservation loss. If not have enough images, additional images will be sampled with class_prompt.
  --output_dir OUTPUT_DIR
                        The output directory where the model predictions and checkpoints will be written.
  --seed SEED           A seed for reproducible training.
  --resolution RESOLUTION
                        The resolution for input images, all the images in the train/validation dataset will be resized to this resolution
  --center_crop         Whether to center crop images before resizing to resolution
  --train_text_encoder  Whether to train the text encoder
  --train_batch_size TRAIN_BATCH_SIZE
                        Batch size (per device) for the training dataloader.
  --sample_batch_size SAMPLE_BATCH_SIZE
                        Batch size (per device) for sampling images.
  --num_train_epochs NUM_TRAIN_EPOCHS
  --max_train_steps MAX_TRAIN_STEPS
                        Total number of training steps to perform. If provided, overrides num_train_epochs.
  --save_steps SAVE_STEPS
                        Save checkpoint every X updates steps.
  --gradient_accumulation_steps GRADIENT_ACCUMULATION_STEPS
                        Number of updates steps to accumulate before performing a backward/update pass.
  --gradient_checkpointing
                        Whether or not to use gradient checkpointing to save memory at the expense of slower backward pass.
  --learning_rate LEARNING_RATE
                        Initial learning rate (after the potential warmup period) to use.
  --scale_lr            Scale the learning rate by the number of GPUs, gradient accumulation steps, and batch size.
  --lr_scheduler LR_SCHEDULER
                        The scheduler type to use. Choose between ["linear", "cosine", "cosine_with_restarts", "polynomial", "constant", "constant_with_warmup"]
  --lr_warmup_steps LR_WARMUP_STEPS
                        Number of steps for the warmup in the lr scheduler.
  --use_8bit_adam       Whether or not to use 8-bit Adam from bitsandbytes.
  --adam_beta1 ADAM_BETA1
                        The beta1 parameter for the Adam optimizer.
  --adam_beta2 ADAM_BETA2
                        The beta2 parameter for the Adam optimizer.
  --adam_weight_decay ADAM_WEIGHT_DECAY
                        Weight decay to use.
  --adam_epsilon ADAM_EPSILON
                        Epsilon value for the Adam optimizer
  --max_grad_norm MAX_GRAD_NORM
                        Max gradient norm.
  --push_to_hub         Whether or not to push the model to the Hub.
  --hub_token HUB_TOKEN
                        The token to use to push to the Model Hub.
  --hub_model_id HUB_MODEL_ID
                        The name of the repository to keep in sync with the local `output_dir`.
  --logging_dir LOGGING_DIR
                        [TensorBoard](https://www.tensorflow.org/tensorboard) log directory. Will default to *output_dir/runs/**CURRENT_DATETIME_HOSTNAME***.
  --mixed_precision {no,fp16,bf16}
                        Whether to use mixed precision. Choose between fp16 and bf16 (bfloat16). Bf16 requires PyTorch >= 1.10.and an Nvidia Ampere GPU. Default to the value of accelerate config of
                        the current system or the flag passed with the `accelerate.launch` command. Use this argument to override the accelerate config.
  --local_rank LOCAL_RANK
                        For distributed training: local_rank
なお、今回は動作検証のため「400」に設定しています。
--max_train_steps=400 `
本気モデルを生成する場合は、「4000」が妥当と言うことです。
「4000」は、多くのモデルを生成しているNitrosocke氏の経験から来る数値になります。
実行したコードが上手くいくと、最後は次のように表示されます。

今回の学習には、約7分の時間がかかったということです。
もちろん、この時間は環境により異なるでしょう。
モデルは、「model」ディレクトリの下に「400」という名前で作成されています。
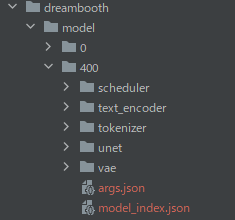
このパスをモデルとして指定すれば、作成したモデルを利用可能です。
model_id = "diffusers/examples/dreambooth/model/400"
今回は、Stable Diffusion v2のモデルをベースに追加学習を行っています。
そのため、Stable Diffusion v2で画像生成を試す必要があります。
画像生成には、上記記事の内容をベースにした次のコードを利用します。
import torch
from diffusers import StableDiffusionPipeline, EulerDiscreteScheduler

model_id = "diffusers/examples/dreambooth/model/400"

scheduler = EulerDiscreteScheduler.from_pretrained(model_id, subfolder="scheduler")
pipe = StableDiffusionPipeline.from_pretrained(model_id, scheduler=scheduler, revision="fp16",
                                               torch_dtype=torch.float16, safety_checker=None)
pipe = pipe.to("cuda")
# pipe.enable_attention_slicing()

prompt = "a man, free_sozai_man person"
image = pipe(
    prompt,
    num_inference_steps=25,
    guidance_scale=9,
).images[0]

image.save("test.png")
上記コードをベースに作成した画像が、以下となります。
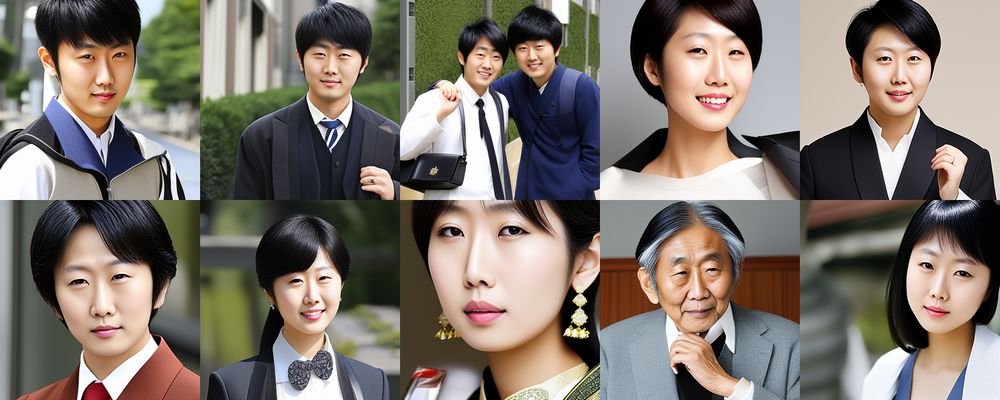
これは、たった400ステップしか学習していません。
時間にすると7分未満です。
さらに言うと、学習に用いた画像は10枚でした。
まだまだ、改善の余地が全然ある状態です。
以上、ShivamShrirao版DreamBoothの動作確認を説明しました。