「Stable Diffusionで生成する画像の精度を上げたい」
「Stable Diffusionでさらにリアルな画像を作成したい」
このような場合には、CLIP Guided Stable Diffusionがオススメです。
この記事では、CLIP Guided Stable Diffusionについて解説しています。
本記事の内容
- CLIP Guided Stable Diffusionとは?
- CLIP Guided Stable Diffusionの効果
- CLIP Guided Stable Diffusionの利用方法
それでは、上記に沿って解説していきます。
CLIP Guided Stable Diffusionとは?
Diffusersでは、パイプラインを簡単にロードすることが可能です。
パイプラインは、機械学習における汎用的な仕組みになります。
パイプラインの詳しい説明は、ここでは省きます。
厳密性を捨てて簡単に表現するなら、ライブラリみたいなモノです。
Pythonでもライブラリを導入すれば、簡単に機能追加ができますよね。
それと似たようなことが、機械学習の世界でもできるということです。
そして、Diffusersでは以下が利用可能になっています。
- Hugging Face Hubのカスタムパイプライン
- 公式コミュニティのパイプライン
CLIP Guided Stable Diffusionは、公式コミュニティのパイプラインになります。
公式コミュニティのパイプラインについては、次のページで説明されています。
diffusers/examples/community at main · huggingface/diffusers · GitHub
https://github.com/huggingface/diffusers/tree/main/examples/community
上記ページにおけるCLIP Guided Stable Diffusionの説明は、以下(DeepLで翻訳して手直し)となっています。
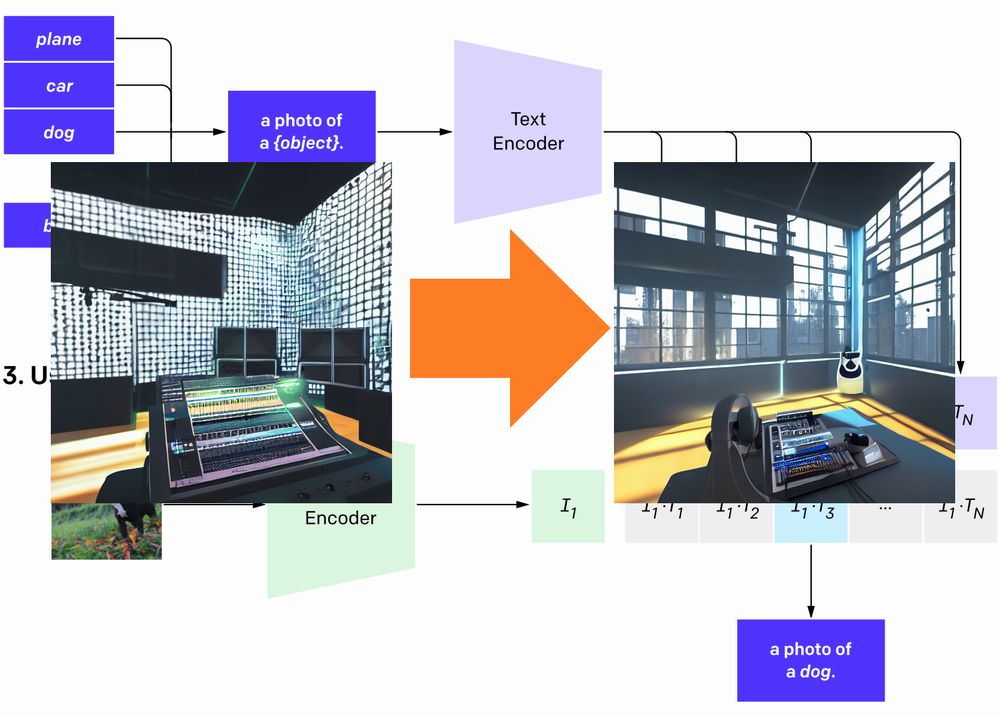
CLIP Guided Stable Diffusionは、ノイズ除去のステップごとにCLIPモデルを追加してStable Diffusionをガイドすることで、よりリアルな画像を生成するのに役立ちます。
正直、意味わかりません。
そもそも、Stable DiffusionはCLIPの技術をベースにしているはずです。

その点では、CLIP Guided Stable Diffusionと何も変わりません。
ただ、利用するモデルが異なるのです。
| クラス | モデル | |
| Stable Diffusion(デフォルト) | StableDiffusionPipeline | frozen CLIP ViT-L/14 |
| CLIP Guided Stable Diffusion | DiffusionPipeline | (※)CLIP-ViT-B-32-laion2B-s34B-b79K |
※サンプルコードで指定されているモデル
モデルは、複数用意されています。
サンプルコードで指定されているモノは、真ん中ぐらいの精度になります。
meanが1に近い方ほど、精度が良いということです。
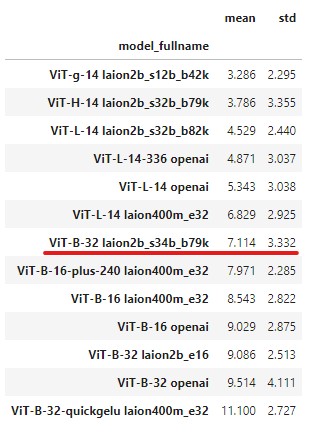
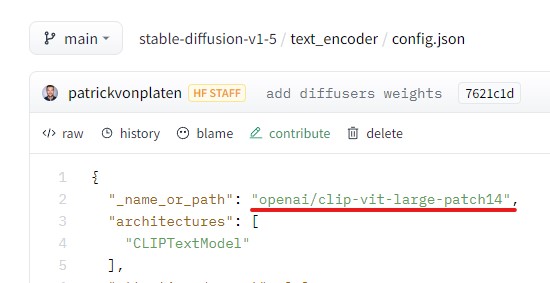
デフォルトの「frozen CLIP ViT-L/14」は、「Vit-L-14 openai」に該当します。
それは、次のconfig.jsonに記載されています。
以上、CLIP Guided Stable Diffusionについて説明しました。
次は、CLIP Guided Stable Diffusionの効果を説明します。
CLIP Guided Stable Diffusionの効果
CLIP Guided Stable Diffusionの効果を検証します。
次の3タイプごとで確認していきます。
- 自然
- 人工物
- 人(顔)
効果検証では、CLIP Guided Stable Diffusionを利用しています。
デフォルトのモデルでも、CLIP Guided Stable Diffusionを利用すると画像精度がアップします。
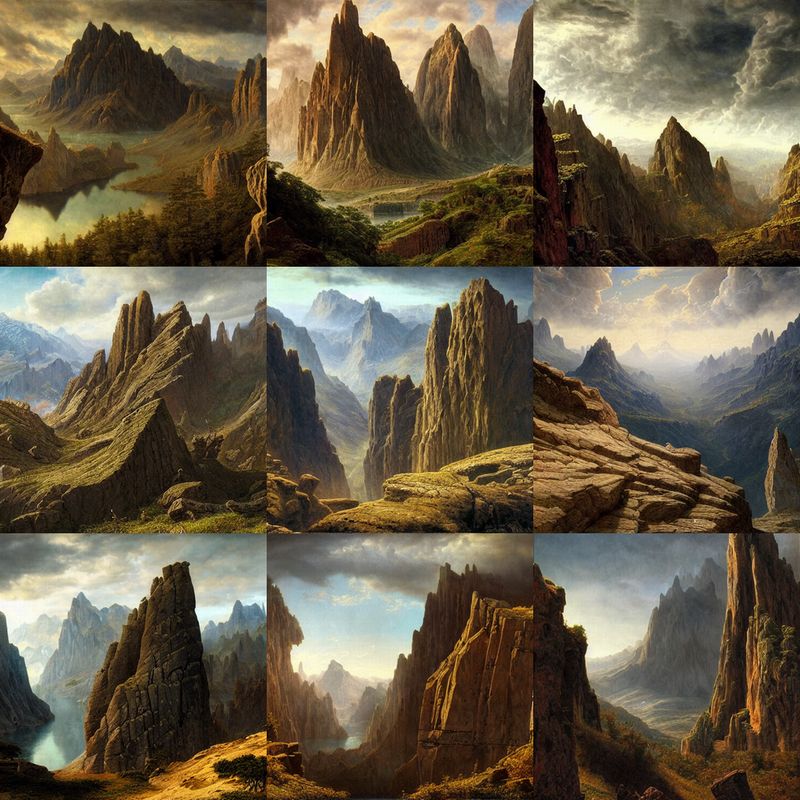
自然
プロンプト
a beautiful and highly detailed matte painting of an epic mountain range, ancient runes carved into the cliff face, intricate details, epic scale, insanely complex, 8 k, sharp focus, hyperrealism, very realistic, by caspar friedrich, james gurney, albert bierstadt,
参考ページ
https://lexica.art/?prompt=6c450e70-cb89-42f6-b3d2-e6c410467adc
デフォルト(frozen CLIP ViT-L/14)
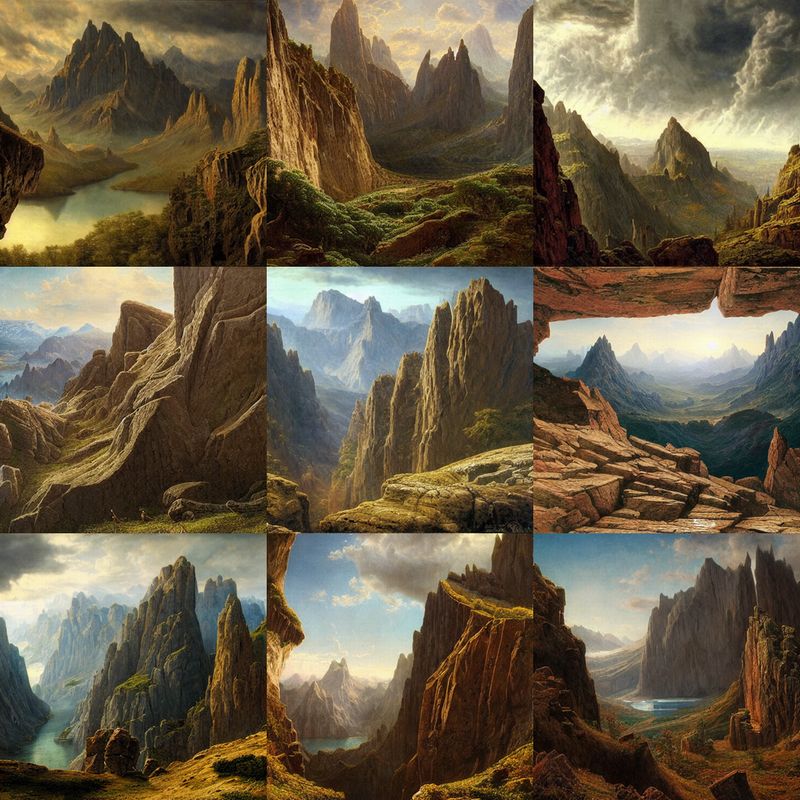
CLIP Guided Stable Diffusion(CLIP-ViT-B-32-laion2B-s34B-b79K)
人工物
プロンプト
Virtual Reality music studio Ableton Live theme concept, light rays coming out of the windows, Paris loft style, raytracing, highly detailed, futuristic, unreal engine 5, photoscan
参考ページ
https://lexica.art/?prompt=738600f7-88b3-4977-84f4-fa04815249a6
デフォルト(frozen CLIP ViT-L/14)

CLIP Guided Stable Diffusion(CLIP-ViT-B-32-laion2B-s34B-b79K)

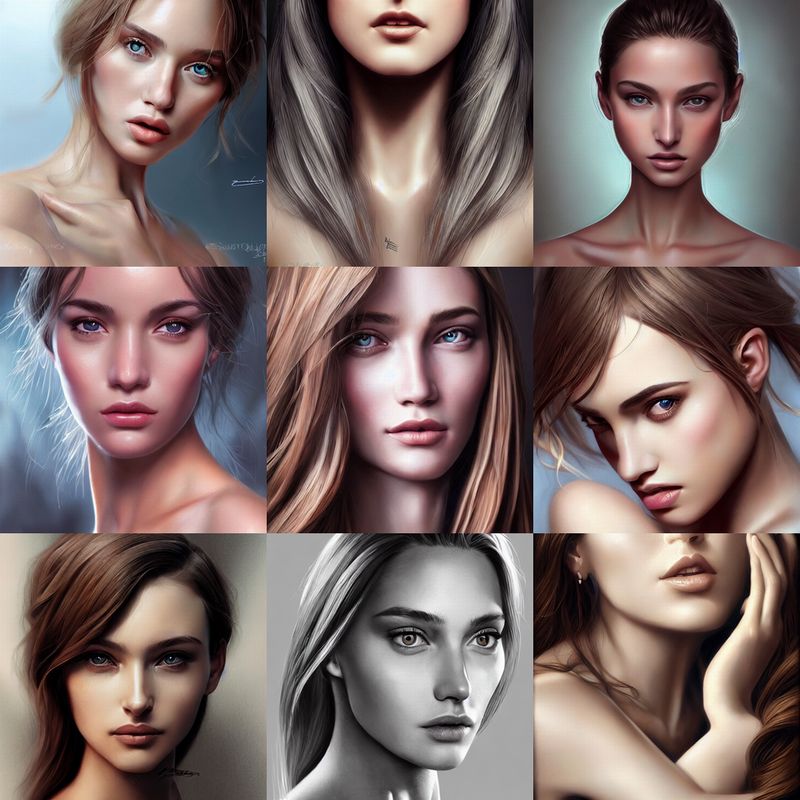
人(顔)
プロンプト
ultra realistic portrait of a beautiful woman, intricate, elegant, highly detailed, digital painting, artstation, concept art, smooth, sharp focus, illustration, art by artgerm, gil elvgen, loomis,
参考ページ
https://lexica.art/?prompt=d33c81ac-2275-4547-be6a-1881750e4ec2
デフォルト(frozen CLIP ViT-L/14)
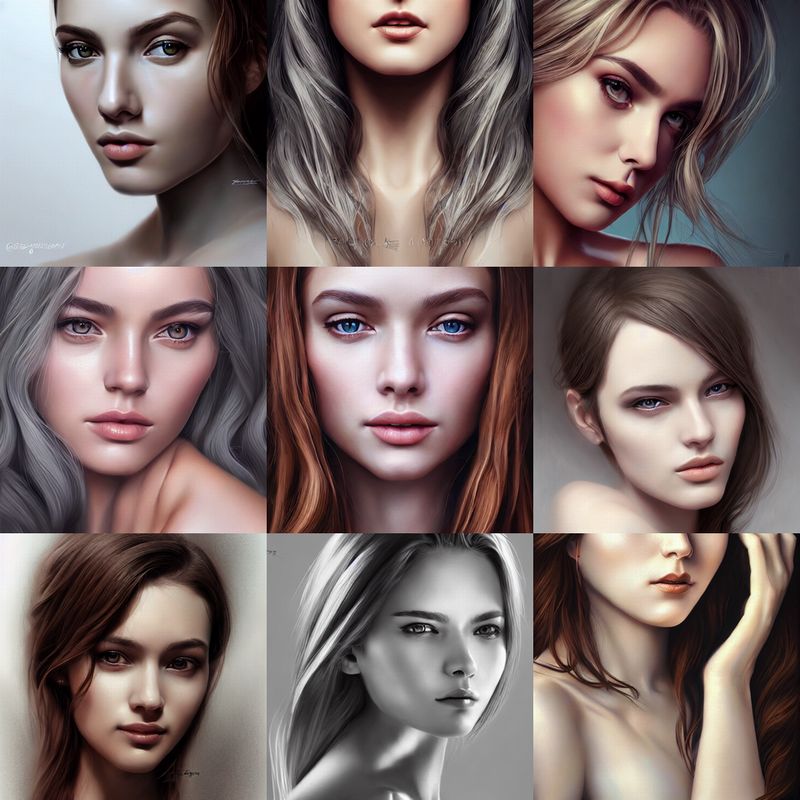
CLIP Guided Stable Diffusion(CLIP-ViT-B-32-laion2B-s34B-b79K)
まとめ
CLIP Guided Stable Diffusionは、画像のリアリティ度を上げると説明されています。
その意味で言えば、CLIP Guided Stable Diffusionを使う意味はあるでしょう。
以上、CLIP Guided Stable Diffusionの効果を説明しました。
次は、CLIP Guided Stable Diffusionの利用方法を説明します。
CLIP Guided Stable Diffusionの利用方法
前提条件として、Stable Diffusionが動くようにしておきましょう。
そして、Diffusersは新しくしておきます。
Diffusers 0.4.0から、パイプラインは機能するようです。
しかし、最新バージョンの(現時点では0.6.0)利用を推奨します。
あと、重要なことを記載しておきます。
公式ページでは、次のように注意書きがあります。
The following code requires roughly 12GB of GPU RAM.
VRAM 12GBは、結構ハードルが高いです。
厳しい場合は、Google Colabなどのクラウドの利用になりますね。
では、CLIP Guided Stable Diffusionを利用するコードを確認しましょう。
from diffusers import DiffusionPipeline
from transformers import CLIPFeatureExtractor, CLIPModel
import torch
from torch import autocast

MODEL_ID = "runwayml/stable-diffusion-v1-5"
LAION_MODEL = "laion/CLIP-ViT-B-32-laion2B-s34B-b79K"
DEVICE = "cuda"
YOUR_TOKEN = "コピーしたアクセストークン"
SEED = 403287740
PROMPT = "a beautiful and highly detailed matte painting of an epic mountain range, ancient runes carved into the cliff face, intricate details, epic scale, insanely complex, 8 k, sharp focus, hyperrealism, very realistic, by caspar friedrich, james gurney, albert bierstadt, "

feature_extractor = CLIPFeatureExtractor.from_pretrained(LAION_MODEL)
clip_model = CLIPModel.from_pretrained(LAION_MODEL, torch_dtype=torch.float32)

pipe = DiffusionPipeline.from_pretrained(
    MODEL_ID,
    custom_pipeline="clip_guided_stable_diffusion",
    clip_model=clip_model,
    feature_extractor=feature_extractor,
    torch_dtype=torch.float32,
    use_auth_token=YOUR_TOKEN
)
pipe.enable_attention_slicing()
pipe = pipe.to(DEVICE)


# ====ここから====
def null_safety(images, **kwargs):
    return images, False


pipe.safety_checker = null_safety
# ====ここまで====

# seed固定
generator = torch.Generator(device=DEVICE).manual_seed(SEED)

with autocast(DEVICE):
    image = pipe(
        PROMPT,
        num_inference_steps=100,
        guidance_scale=7,
        clip_guidance_scale=100,
        use_cutouts=False,
        generator=generator
    ).images[0]

    image.save("test.png")
書き換える必要があるのは、以下の部分になります。
MODEL_ID = "runwayml/stable-diffusion-v1-5"
LAION_MODEL = "laion/CLIP-ViT-B-32-laion2B-s34B-b79K"
DEVICE = "cuda"
YOUR_TOKEN = "コピーしたアクセストークン"
SEED = 403287740
PROMPT = "a beautiful and highly detailed matte painting of an epic mountain range, ancient runes carved into the cliff face, intricate details, epic scale, insanely complex, 8 k, sharp focus, hyperrealism, very realistic, by caspar friedrich, james gurney, albert bierstadt, "
Stable Diffusion自体のモデルは、1.5vを利用しています。
1.4vでも問題ありませんが、折角なので新しいモノを利用しましょう。
CLIPモデルのバージョンは、サンプルで指定されたモノを記載しています。
GPUに余裕があれば、もっと精度の高いモデルを利用するのもありでしょう。
「”コピーしたアクセストークン”」についてわからない場合は、次の記事をご覧ください。
「Access Token(アクセストークン)の取得」という箇所で説明しています。
設定さえ適切に記述すれば、上記コードはそのまま動くはずです。
なお、NSFWフィルターを回避するための工夫を行っています。
処理を待った後に、画像が真っ黒だと時間の無駄ですからね。

以上、CLIP Guided Stable Diffusionの利用方法を説明しました。