「高いセキュリティレベルのCMSを探している」
「Python製のCMSを利用したい」
このような場合には、Ploneがオススメです。
この記事では、Python製CMSのPloneについて解説しています。
本記事の内容
- Ploneとは?
- Ploneのシステム要件
- Ploneのインストール
- Ploneの動作確認
それでは、上記に沿って解説していきます。
Ploneとは?
Ploneとは、コンテンツ管理システムです。
CMSと言った方が、わかりやすいかもしれません。
CMSと言えば、WordPressを思い浮かべる人がいるでしょう。
WordPressは、PHPで開発されています。
それに対して、PloneはPython製です。
Pythonで開発されているというのが、大きな特徴と言えます。
また、Ploneには以下の強みがあります。
- 非常に優れたセキュリティ
- 拡張性
- 高いユーザビリティ
- 柔軟性
特にセキュリティは、他のどのCMSよりも優れていると言われています。
セキュリティを意識するなら、Ploneは有力なCMSと言えるでしょう。
以上、Ploneについて説明しました。
次は、Ploneのシステム要件を説明します。
Ploneのシステム要件
現時点(2022年6月末)でのPloneの最新バージョンは、5.2.8となります。
この最新バージョンは、2022年4月29日にリリースされています。
ここでは、Ploneをpipでインストールする場合のシステム要件を説明します。
pip以外では、Dockerやバイナリ設置などインストール方法が用意されています。
pipでインストールする際には、次の点がポイントになります。
- OS
- Pythonバージョン
- 仮想環境
- Pasteライブラリ
それぞれを下記で説明します。
OS
サポートOSに関しては、以下を含むクロスプラットフォーム対応です。
- Windows
- macOS
- Linux
Pythonバージョン
サポート対象となるPythonのバージョンは、以下となっています。
- Python 2.7
- Python 3.6
- Python 3.7
- Python 3.8
正直、このサポート状況はどうなんだと言いたいです。
以下は、Python公式開発サイクルになります。
| バージョン | リリース日 | サポート期限 |
| 3.6 | 2016年12月23日 | 2021年12月23日 |
| 3.7 | 2018年6月27日 | 2023年6月27日 |
| 3.8 | 2019年10月14日 | 2024年10月 |
| 3.9 | 2020年10月5日 | 2025年10月 |
| 3.10 | 2021年10月4日 | 2026年10月 |
これに従うと、Python 3.7と3.8しか選択肢がありません。
さすがにこれでは選択肢の幅がありません。
でも、安心してください。
Python 3.10でPlone 5.2.8が動くことは検証済みです。
したがって、Python 3.7以降を推奨しておきます。
仮想環境
システム要件に含めるかどうか微妙です。
しかし、あえてシステム要件に含めます。
Ploneは、必ずPython仮想環境にインストールしましょう。
その理由は、依存パッケージの多さにあります。
過去に見たことがないレベルの多さです。
後ほど、その一覧を確認できます。
Python仮想環境については、次の記事で解説しています。
Pasteライブラリ
Ploneの起動時に、次のようなエラーが出てしまうことがあります。
pkg_resources.DistributionNotFound: The 'Paste' distribution was not found and is required by the application
Pasteモジュール(ライブラリ)が見つからないという内容です。
そのため、個別にPasteライブラリをインストールします。
pip install Plone
まとめ
ここまでをまとめると、Python 3.7以降を使いましょうということです。
そして、「Paste」についてエラーが出る場合はインストールしましょう。
あと、Python仮想環境へのインストールは必須と考えてください。
そうしないと、Pythonの環境がメチャクチャになってしまう可能性があります。
以上、Ploneのシステム要件を説明しました。
次は、Ploneのインストールを説明します。
Ploneのインストール
検証は、次のバージョンのPythonで行います。
$ python -V
Python 3.10.2
まずは、現状のインストール済みパッケージを確認しておきます。
Pasteは事前にインストール済みです。
$ pip list
Package    Version
---------- -------
Paste      3.5.1
pip        22.1.2
setuptools 62.6.0
wheel      0.36.2
次にするべきことは、pipとsetuptoolsの更新です。
pipコマンドを使う場合、常に以下のコマンドを実行しておきましょう。
python -m pip install --upgrade pip setuptools
では、Ploneのインストールです。
Ploneのインストールは、以下のコマンドとなります。
pip install Plone
Ploneのインストールは、かなりの時間がかかります。
途中で不安になるほど待たされます。
でも、処理が続く限りはそのまま待ちましょう。
終了したら、どんなパッケージがインストールされたのかを確認します。
$ pip list
Package                        Version
------------------------------ -----------
AccessControl                  5.3.1
Acquisition                    4.10
attrs                          21.4.0
AuthEncoding                   4.3
beautifulsoup4                 4.11.1
borg.localrole                 3.1.8
BTrees                         4.10.0
calmjs.parse                   1.3.0
certifi                        2022.6.15
cffi                           1.15.0
Chameleon                      3.10.1
charset-normalizer             2.0.12
collective.monkeypatcher       1.2.1
cssselect                      1.1.0
DateTime                       4.4
decorator                      5.1.1
diazo                          1.4.2
DocumentTemplate               4.0
docutils                       0.18.1
ExtensionClass                 4.6
feedparser                     6.0.10
five.customerize               2.0.1
five.intid                     1.2.6
five.localsitemanager          3.3
future                         0.18.2
icalendar                      4.0.9
idna                           3.3
jsonschema                     4.6.0
lxml                           4.9.0
Markdown                       3.3.7
Missing                        4.1
mockup                         4.0.2
MultiMapping                   4.1
multipart                      0.2.4
Paste                          3.5.1
PasteDeploy                    2.1.1
Persistence                    3.3
persistent                     4.9.0
piexif                         1.1.3
Pillow                         9.1.1
pip                            22.1.2
Plone                          5.2.8
plone.alterego                 1.1.5
plone.api                      1.11.1
plone.app.caching              2.1.0
plone.app.content              4.0.0a13
plone.app.contentlisting       2.0.7
plone.app.contentmenu          3.0.0b1
plone.app.contentrules         4.1.6
plone.app.contenttypes         2.2.3
plone.app.customerize          1.3.12
plone.app.dexterity            2.6.11
plone.app.discussion           3.4.7
plone.app.event                3.2.14
plone.app.i18n                 3.0.6
plone.app.intid                1.1.4
plone.app.iterate              4.0.3
plone.app.layout               4.0.0b1
plone.app.linkintegrity        3.6.1
plone.app.locales              6.0.2
plone.app.lockingbehavior      1.0.7
plone.app.multilingual         5.6.4
plone.app.portlets             4.4.7
plone.app.querystring          1.6.0
plone.app.redirector           2.2.1
plone.app.registry             2.0.0a9
plone.app.relationfield        2.0.3
plone.app.textfield            1.3.6
plone.app.theming              4.1.7
plone.app.upgrade              2.1.1
plone.app.users                2.6.6
plone.app.uuid                 2.1.0
plone.app.versioningbehavior   1.4.6
plone.app.viewletmanager       3.1.2
plone.app.vocabularies         4.3.0
plone.app.widgets              4.0.0a2
plone.app.workflow             4.0.4
plone.app.z3cform              3.2.4
plone.autoform                 2.0.0a1
plone.base                     1.0.0b1
plone.batching                 1.1.7
plone.behavior                 1.4.0
plone.browserlayer             2.2.4
plone.cachepurging             2.0.4
plone.caching                  1.2.2
plone.contentrules             2.1.2
plone.dexterity                2.10.5
plone.event                    1.4.1
plone.folder                   3.1.0
plone.formwidget.namedfile     2.1.3
plone.formwidget.recurrence    2.1.5
plone.i18n                     5.0.0a5
plone.indexer                  1.0.7
plone.intelligenttext          3.1.0
plone.keyring                  3.1.3
plone.locking                  2.2.5
plone.memoize                  2.1.1
plone.namedfile                5.6.0
plone.outputfilters            4.1.0
plone.portlet.collection       3.3.6
plone.portlet.static           3.1.6
plone.portlets                 2.3.2
plone.protect                  4.1.6
plone.registry                 1.2.1
plone.resource                 2.1.4
plone.resourceeditor           3.0.3
plone.rest                     1.6.2
plone.restapi                  8.23.0
plone.rfc822                   2.0.2
plone.scale                    3.1.2
plone.schema                   1.4.0
plone.schemaeditor             3.0.3
plone.session                  3.7.5
plone.staticresources          1.4.6
plone.stringinterp             1.3.3
plone.subrequest               1.9.3
plone.supermodel               1.6.4
plone.synchronize              1.0.4
plone.theme                    3.0.7
plone.transformchain           2.0.2
plone.uuid                     1.0.6
plone.z3cform                  2.0.0b1
plonetheme.barceloneta         2.1.10
ply                            3.11
Products.BTreeFolder2          4.3
Products.CMFCore               2.5.4
Products.CMFDiffTool           3.3.3
Products.CMFDynamicViewFTI     6.0.3
Products.CMFEditions           3.3.4
Products.CMFFormController     4.1.4
Products.CMFPlacefulWorkflow   2.0.4
Products.CMFPlone              5.2.8
Products.CMFQuickInstallerTool 4.0.4
Products.CMFUid                3.2.0
Products.DateRecurringIndex    3.0.1
Products.DCWorkflow            2.5.0
Products.ExtendedPathIndex     4.0.1
Products.ExternalMethod        4.5
Products.GenericSetup          2.2.0
Products.isurlinportal         1.2.1
Products.MailHost              4.12
Products.MimetypesRegistry     2.1.9
Products.PlonePAS              6.0.8
Products.PluggableAuthService  2.7.0
Products.PluginRegistry        1.9
Products.PortalTransforms      3.2.0
Products.PythonScripts         4.13
Products.Sessions              4.12
Products.SiteErrorLog          5.5
Products.StandardCacheManagers 4.1.1
Products.statusmessages        5.0.5
Products.TemporaryFolder       6.2
Products.ZCatalog              6.2
Products.ZODBMountPoint        1.2
Products.ZopeVersionControl    2.0.0
pycparser                      2.21
PyJWT                          2.4.0
pyrsistent                     0.18.1
pyScss                         1.4.0
python-dateutil                2.8.2
python-gettext                 4.0
pytz                           2022.1
Record                         3.5
repoze.xmliter                 0.6.1
requests                       2.28.0
RestrictedPython               6.0a1.dev0
roman                          3.3
setuptools                     62.6.0
sgmllib3k                      1.0.0
simplejson                     3.17.6
six                            1.16.0
soupsieve                      2.3.2.post1
tempstorage                    5.2
transaction                    3.0.1
Unidecode                      1.3.4
urllib3                        1.26.9
waitress                       2.1.2
WebOb                          1.8.7
WebTest                        3.0.0
wheel                          0.36.2
WSGIProxy2                     0.5.1
z3c.autoinclude                0.4.1
z3c.caching                    2.2
z3c.form                       4.3
z3c.formwidget.query           0.17
z3c.objpath                    1.2
z3c.pt                         3.3.1
z3c.relationfield              0.9.0
z3c.zcmlhook                   1.1
zc.lockfile                    2.0
zc.relation                    1.1.post2
ZConfig                        3.6.0
zdaemon                        4.3
ZEO                            5.3.0
zExceptions                    4.2
ZODB                           5.7.0
ZODB3                          3.11.0
zodbpickle                     2.3
Zope                           5.5.1
zope.annotation                4.7.0
zope.app.locales               4.2
zope.browser                   2.4
zope.browsermenu               4.4
zope.browserpage               4.4.0
zope.browserresource           4.4
zope.cachedescriptors          4.3.1
zope.component                 5.0.1
zope.componentvocabulary       2.3.0
zope.configuration             4.4.1
zope.container                 4.5.0
zope.contentprovider           4.2.1
zope.contenttype               4.5.0
zope.copy                      4.2
zope.datetime                  4.3.0
zope.deferredimport            4.4
zope.deprecation               4.4.0
zope.dottedname                4.3
zope.event                     4.5.0
zope.exceptions                4.5
zope.filerepresentation        5.0.0
zope.globalrequest             1.5
zope.hookable                  5.1.0
zope.i18n                      4.9.0
zope.i18nmessageid             5.0.1
zope.interface                 5.4.0
zope.intid                     4.4.0
zope.keyreference              5.0.0
zope.lifecycleevent            4.4
zope.location                  4.2
zope.pagetemplate              4.6.0
zope.processlifetime           2.3.0
zope.proxy                     4.5.0
zope.ptresource                4.3.0
zope.publisher                 6.1.0
zope.ramcache                  2.4
zope.schema                    6.2.0
zope.security                  5.3
zope.sendmail                  5.2
zope.sequencesort              4.2
zope.site                      4.5.0
zope.size                      4.3
zope.structuredtext            4.4
zope.tal                       4.5
zope.tales                     5.1
zope.testbrowser               5.6.1
zope.testing                   4.10
zope.traversing                4.4.1
zope.viewlet                   4.3
Zope2                          4.0
依存パッケージの数が、尋常ではありません。
Ploneは、それだけ多くの技術に支えられているということでしょう。
以上、Ploneのインストールを説明しました。
次は、Ploneの動作確認を説明します。
Ploneの動作確認
まずは、次のコマンドが利用できるかどうか確認しましょう。
mkwsgiinstance -h
次のように表示されれば、Ploneのインストールは問題ありません。
$ mkwsgiinstance -h
mkwsgiinstance:  Create a Zope WSGI instance home.

usage:  mkwsgiinstance [options]

Options:
-h/--help -- print this help text
-d/--dir  -- the dir in which the instance home should be created
-u/--user NAME:PASSWORD -- set the user name and password of the initial user
-s/--skelsrc -- the dir from which skeleton files should be copied
-p/--python -- the Python interpreter to use

When run without arguments, this script will ask for the information
necessary to create a Zope WSGI instance home.
Ploneは、ZopeをWebアプリケーションフレームワークに採用しています。
次のコマンドにより、その設定を保存する場所を作成します。
mkwsgiinstance -d 保存先
実際に実行した結果は、以下。
$ mkwsgiinstance -d ./profiles
Please choose a username and password for the initial user.
These will be the credentials you use to initially manage
your new Zope instance.

Username: tester
Password:
Verify password:
途中でUsernameとPasswordを入力する必要があります。
上記は、「tester」というUsernameを入力しています。
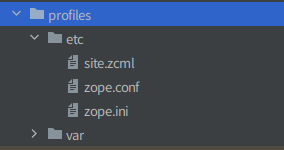
処理が完了すると、指定した(profiles)ディレクトリが作成されます。

ディレクトリの中には、アプリケーションの設定ファイルが作成されています。
準備ができたので、アプリケーション(Zope)を起動します。
起動には、次のコマンドを用います。
runwsgi -v zope.iniのパス
zope.iniには、アプリケーションの情報が記載されています。
zope.ini
[app:zope]
use = egg:Zope#main
zope_conf = %(here)s/zope.conf

[server:main]
use = egg:waitress#main
host = 127.0.0.1
port = 8080

[filter:translogger]
use = egg:Paste#translogger
setup_console_handler = False

[pipeline:main]
pipeline =
    egg:Zope#httpexceptions
    translogger
    zope

[loggers]
keys = root, waitress.queue, waitress, wsgi

[handlers]
keys = console, accesslog, eventlog

[formatters]
keys = generic, message

[formatter_generic]
format = %(asctime)s %(levelname)s [%(name)s:%(lineno)s][%(threadName)s] %(message)s
datefmt = %Y-%m-%d %H:%M:%S

[formatter_message]
format = %(message)s

[logger_root]
level = INFO
handlers = console, eventlog

[logger_waitress.queue]
level = INFO
handlers = eventlog
qualname = waitress.queue
propagate = 0

[logger_waitress]
level = INFO
handlers = eventlog
qualname = waitress

[logger_wsgi]
level = WARN
handlers = accesslog
qualname = wsgi
propagate = 0

[handler_console]
class = StreamHandler
args = (sys.stderr,)
level = NOTSET
formatter = generic

[handler_accesslog]
class = FileHandler
args = ('/home/gansuke/PycharmProjects/Plone/profiles/var/log/Z4.log','a')
level = INFO
formatter = message

[handler_eventlog]
class = FileHandler
args = ('/home/gansuke/PycharmProjects/Plone/profiles/var/log/event.log', 'a')
level = INFO
formatter = generic
実際には、次のようにコマンドを実行しています。
$ runwsgi -v profiles/etc/zope.ini
2022-06-26 19:07:19 INFO [chameleon.config:38][MainThread] directory cache: /home/gansuke/PycharmProjects/Plone/profiles/var/cache.
2022-06-26 19:07:50 INFO [Zope:42][MainThread] Ready to handle requests
Starting server in PID 193817.
2022-06-26 19:07:50 INFO [waitress:486][MainThread] Serving on http://127.0.0.1:8080
デフォルトでは、http://127.0.0.1:8080でPloneは起動しています。
ブラウザでこのURLにアクセスします。
サーバーにPloneをインストールしているなら、そのIPアドレスをもとにアクセス。
IPアドレスを確認する方法は、次の記事で説明しています。
アクセスの際には、ポートは開放しておく必要があります。
今回であれば、ポート8080になります。
変更したければ、zope.iniを変更します。
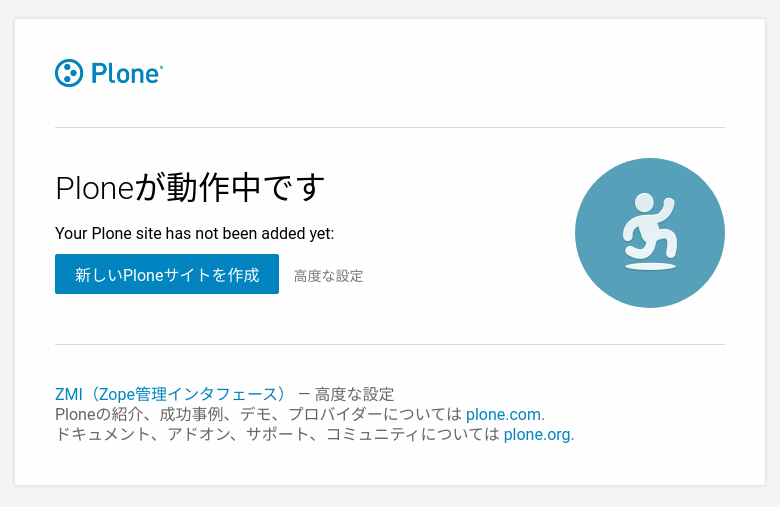
該当のURLにアクセスしたら、次のような画面を確認できます。

「Ploneが動作中です」と確認できれば、Ploneの動作確認はOKです。
以上、Ploneの動作確認を説明しました。


