「元画像の構図を崩さないimg2imgを行いたい」
「ControlNetよりも高度な構図制御を行いたい」
このような場合には、T2I-Adapterがオススメです。
この記事では、T2I-Adapterについて解説しています。
本記事の内容
- T2I-Adapterとは?
- T2I-Adapterのシステム要件
- T2I-Adapterのインストール
- T2I-Adapterの動作確認
それでは、上記に沿って解説していきます。
T2I-Adapterとは?
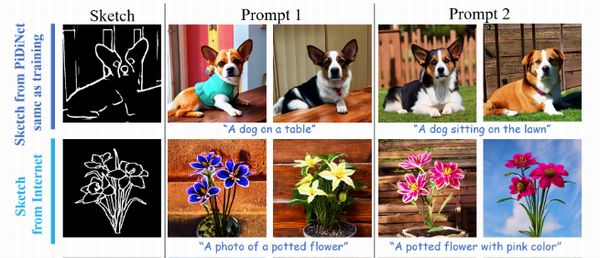
T2I-Adapterを用いると、pix2pixによる画像生成が可能になります。
これは、ControlNetと同じような技術です。
基本的には、ControlNetと同じようなことが可能です。
エッジ検出された画像をベースに行う画像生成は、当然のようにあります。

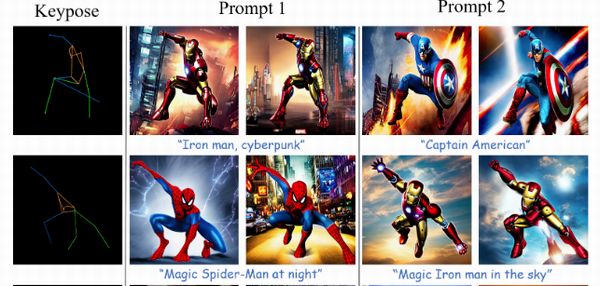
そして、棒人間とも言われている姿勢推定モデルを用いた画像生成もあります。

ControlNetは、姿勢推定にOpenPoseを用いています。
それに対して、T2I-AdapterではMMPoseを利用しています。
OpenPoseは、いろいろとライセンス面で複雑です。
スポーツ領域での使用は禁止、商用利用禁止などなど。
その点で言えば、MMPoseは商用利用でも何でもOK。
ここまでの機能であれば、ControlNetもT2I-Adapterもそう変わりません。
これらに加えて、T2I-Adapterには以下の機能が備わっています。
- Local editing with the sketch adapter
- Combine different concepts with adapter
- Sequential editing with the sketch adapter
- Composable Guidance with multiple adapters
Local editing with the sketch adapter
Sketch(エッジ検出による画像生成)とInpaintingを組み合わせた機能です。
その意味では、ControlNetと既存のInpaintingを併用すれば事足りると言えます。

Combine different concepts with adapter
異なるコンセプトを結合できるということのようです。

エッジ検出された画像があれば、コンセプトの結合が容易ということなのでしょう。
「A car」と「flying wings」という異なるコンセプトが、エッジ検出された画像をベースに融合できています。
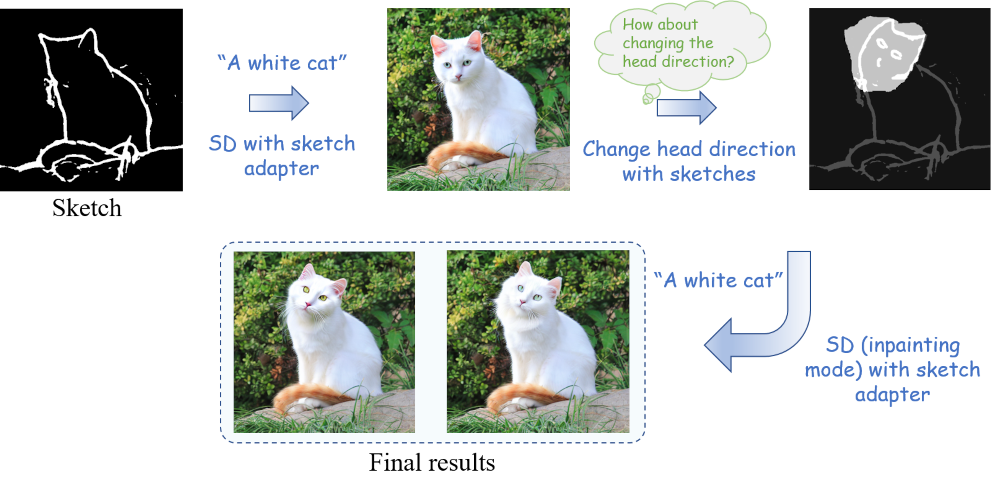
Sequential editing with the sketch adapter
文字での説明より、次の画像を見た方がわかりやすいです。

連続した画像への処理ができるということなのでしょう。
Sketch(エッジ検出)に始まり、次の処理が追加で実行されています。
- Local editing with the sketch adapter
- Combine different concepts with adapter
Composable Guidance with multiple adapters
T2I-Adapterには、基本的な構図制御の処理として以下が用意されています。
- Sketch Adapter
- Keypose Adapter
- Segmentation Adapter
これらは、ControlNetにも備わっています。
なんと、T2I-Adapterはこれらの処理を結合することができるのです。
それを示しているのが、次の画像となります。

入力したプロンプトが、Segmentation・Sketchのそれぞれで上手く制御できない場合があります。
そのようなときに、SegmentationとSketchを組み合わせて対応することを可能にしています。
コード(プログラム)見た感じでは、以下の二つが結合可能のようです。
- Sketch Adapter
- Segmentation Adapter
以上、T2I-Adapterについて説明しました。
次は、T2I-Adapterのシステム要件を説明します。
T2I-Adapterのシステム要件
現時点でのT2I-Adapterのバージョンは、0.0.1となります。
公式ページに記載はなく、setup.pyに記載されています。

そして、公式ではシステム要件が以下となっています。

ただし、これは情報が不足しています。
この情報を補う形で、システム要件を以下に挙げておきます。
- OS
- PyTorch
- FFmpeg
それぞれを以下で説明します。
OS
これが最も重要なポイントになります。
現状では、Linuxのみがサポート対象となっています。
Windowsで動かそうとすると、次のメッセージが表示されます。
NOTE: Redirects are currently not supported in Windows or MacOs.
エラーとしては、次のようなエラーが表示されることになります。
torch.distributed.elastic.multiprocessing.errors.ChildFailedError
確かに、multiprocessingはLinux以外ではトラブルが多い印象です。
公式が未対応と言っている以上、ここは素直に対応されるまで待ちましょう。
でも、こんな大事なことは公式ページに明示してほしいと感じます。
PyTorch
PyTorchは、公式ページでは明記はされています。
ただし、GPU版の利用が必須です。
CPU版でもインストールは可能でしょう。
しかし、まともに動くとは思えません。
よって、GPU版PyTorchを推奨しておきます。
上記記事はWindowsですが、Linuxの方がもっと簡単です。
CUDA 11.7の場合なら、次のコマンドだけで済みます。
pip install torch torchvision torchaudio
なお、CUDA 11.6ならWindowsと同じコマンドになります。
pip install torch torchvision torchaudio --extra-index-url https://download.pytorch.org/whl/cu116
FFmpeg
どこでどのように利用されているのかは、不明です。
ただ、Pythonライブラリの「imageio-ffmpeg」がインストール時に必要となります。
そのため、その前提となるFFmpegが必要となるのは明らかです。
Linxuならインストールは、コマンドを叩くだけになります。
以上、T2I-Adapterのシステム要件を説明しました。
次は、T2I-Adapterのインストールを説明します。
T2I-Adapterのインストール
T2I-Adapterのインストールは、Python仮想環境の利用をオススメします。
Python仮想環境は、次の記事で解説しています。
検証は、次のバージョンのPythonで行います。
$ python -V
Python 3.9.15
まずは、GitHubからリポジトリを取得します。
git clone https://github.com/TencentARC/T2I-Adapter.git
作業場となるリポジトリルートへ移動。
cd T2I-Adapter
公式では、ここにあるrequirements.txtを利用する手順が記載されています。

しかし、environment.yamlも存在しているのですよね。
condaとpipの合わせ技でインストールすることを開発者は想定しているのかもしれません。
でも、このような合わせ技は複雑であり、トラブルの元です。
そのため、pipに一本化します。
environment.yamlをベースにrequirements.txtを新規に作成しましょう。
その方法は、次の記事で解説しています。
そして、旧requirements.txtから必要なモノをコピーします。
あと、matplotlibはどこにも明記されていませんが必要です。
これがないとエラーが出ます。
このようにして新たに作成したのが、以下となります。
PyTorch関連はインストール済みのため、除外しています。
requirements.txt(新規作成)
numpy
albumentations
diffusers
opencv-python
pudb
invisible-watermark
imageio
imageio-ffmpeg
pytorch-lightning
omegaconf
test-tube
streamlit
einops
torch-fidelity
transformers
torchmetrics
kornia
git+https://github.com/CompVis/taming-transformers.git@master#egg=taming-transformers
git+https://github.com/openai/CLIP.git@main#egg=clip
matplotlib
basicsr
taming-transformers-rom1504==0.0.6
では、次のコマンドで一気にインストールしましょう。
pip install -r requirements.txt
以上、T2I-Adapterのインストールを説明しました。
次は、T2I-Adapterの動作確認を説明します。
T2I-Adapterの動作確認
T2I-Adapterの動作確認を行っていきます。
動作確認は、次の手順で行います。
- モデルのダウンロード
- Image to Image Transition(Sketch Adapter)の実行
それぞれを以下で説明します。
モデルのダウンロード
「models」ディレクトリの初期状態は、以下。

ここに必要なモデルを設置する必要があります。
公式では、次の3種類を設置するように記載されています。
- T2I-Adapters
- clip-vit-large-patch14
- Stable Diffusion v1.4(Anything v4.0でも可)
T2I-Adapters
T2I-Adapter独自のモデルです。
TencentARC/T2I-Adapter at main
https://huggingface.co/TencentARC/T2I-Adapter/tree/main/models
上記ページから、次の3ファイルをダウンロードします。
| Adapter Name | Adapter Description |
|---|---|
| t2iadapter_sketch_sd14v1.pth | The adapter for sketch-to-image generation. |
| t2iadapter_keypose_sd14v1.pth | The adapter for keypose-to-image generation. |
| t2iadapter_seg_sd14v1.pth | The adapter for segmentation-to-image generation. |
コマンドで行うなら、「models」に移動して以下を実行。
wget -O t2iadapter_keypose_sd14v1.pth https://huggingface.co/TencentARC/T2I-Adapter/resolve/main/models/t2iadapter_keypose_sd14v1.pth
wget -O t2iadapter_seg_sd14v1.pth https://huggingface.co/TencentARC/T2I-Adapter/resolve/main/models/t2iadapter_seg_sd14v1.pth
wget -O t2iadapter_sketch_sd14v1.pth https://huggingface.co/TencentARC/T2I-Adapter/resolve/main/models/t2iadapter_sketch_sd14v1.pth
clip-vit-large-patch14
Open AIが公開しているCLIP用のモデルです。
openai/clip-vit-large-patch14 · Hugging Face
https://huggingface.co/openai/clip-vit-large-patch14/
以下のファイルをすべてダウンロードする必要があります。
https://huggingface.co/openai/clip-vit-large-patch14/tree/main

「models」ディレクトリ上において、次のコマンド一撃でダウンロードできます。
git clone https://huggingface.co/openai/clip-vit-large-patch14/
Stable Diffusion v1.4(Anything v4.0でも可)
画像生成時に利用するモデルになります。
Stable Diffusion v1.4が標準となっています。
しかし、Anything v4.0でもOKとのことです。
ということで、今回はAnything v4.0を利用します。
https://huggingface.co/andite/anything-v4.0/tree/main
上記ページより、「anything-v4.0-pruned.ckpt」をダウンロード。
そして、「models」に設置します。
ここまでの処理を終えると、「models」は次のような状況になっています。

Image to Image Transition(Sketch Adapter)の実行
Image to Image Transition(画像間遷移)を試してみましょう。
まずは、リポジトリルートに戻っておきます。
戻ったら、次のコマンドを実行します。
サンプル画像は用意されているので、別途用意は不要です。
python -m torch.distributed.launch --nproc_per_node=1 test_sketch.py --plms --auto_resume --prompt "A beautiful girl" --path_cond examples/sketch/human.png --ckpt models/anything-v4.0-pruned.ckpt --type_in image
処理時間は、そこそこかかります。
全部で10回の処理が行われています。
処理がすべて終わると、「experiments」ディレクトリを確認しましょう。
次のようになっていれば、成功です。
.
└── test_sketch
    ├── models
    ├── test_sketch.yaml
    ├── train_test_sketch_20230218_095012.log
    ├── training_states
    └── visualization
        ├── edge_idx0000.png
        ├── edge_idx0001.png
        ├── edge_idx0002.png
        ├── edge_idx0003.png
        ├── edge_idx0004.png
        ├── edge_idx0005.png
        ├── edge_idx0006.png
        ├── edge_idx0007.png
        ├── edge_idx0008.png
        ├── edge_idx0009.png
        ├── sample_idx0000_s0000.png
        ├── sample_idx0001_s0000.png
        ├── sample_idx0002_s0000.png
        ├── sample_idx0003_s0000.png
        ├── sample_idx0004_s0000.png
        ├── sample_idx0005_s0000.png
        ├── sample_idx0006_s0000.png
        ├── sample_idx0007_s0000.png
        ├── sample_idx0008_s0000.png
        └── sample_idx0009_s0000.png
生成された画像は、以下。

結果を見れば、何となくわかりますね。
入力した画像をエッジ検出したのが、edge_idxで始まる画像です。
そして、そのエッジ検出された画像に「A beautiful girl」とプロンプトを入力しています。
その結果生成されたのが、sample_idxで始まる画像となります。
一応、入力した画像を確認しておきます。
human.png

コマンドの詳細については、ヘルプで確認可能です。
$ python test_sketch.py -h
usage: test_sketch.py [-h] [--prompt [PROMPT]] [--path_cond PATH_COND] [--type_in TYPE_IN] [--bsize BSIZE]
                      [--epochs EPOCHS] [--num_workers NUM_WORKERS] [--use_shuffle USE_SHUFFLE] [--dpm_solver]
                      [--plms] [--auto_resume] [--ckpt CKPT] [--ckpt_ad CKPT_AD] [--config CONFIG]
                      [--print_fq PRINT_FQ] [--H H] [--W W] [--C C] [--f F] [--ddim_steps DDIM_STEPS]
                      [--n_samples N_SAMPLES] [--ddim_eta DDIM_ETA] [--scale SCALE] [--gpus GPUS]
                      [--local_rank LOCAL_RANK] [--launcher LAUNCHER]

optional arguments:
  -h, --help            show this help message and exit
  --prompt [PROMPT]
  --path_cond PATH_COND
  --type_in TYPE_IN
  --bsize BSIZE         the prompt to render
  --epochs EPOCHS       the prompt to render
  --num_workers NUM_WORKERS
                        the prompt to render
  --use_shuffle USE_SHUFFLE
                        the prompt to render
  --dpm_solver          use dpm_solver sampling
  --plms                use plms sampling
  --auto_resume         use plms sampling
  --ckpt CKPT           path to checkpoint of model
  --ckpt_ad CKPT_AD
  --config CONFIG       path to config which constructs model
  --print_fq PRINT_FQ   path to config which constructs model
  --H H                 image height, in pixel space
  --W W                 image width, in pixel space
  --C C                 latent channels
  --f F                 downsampling factor
  --ddim_steps DDIM_STEPS
                        number of ddim sampling steps
  --n_samples N_SAMPLES
                        how many samples to produce for each given prompt. A.k.a. batch size
  --ddim_eta DDIM_ETA   ddim eta (eta=0.0 corresponds to deterministic sampling
  --scale SCALE         unconditional guidance scale: eps = eps(x, empty) + scale * (eps(x, cond) - eps(x, empty))
  --gpus GPUS           gpu idx
  --local_rank LOCAL_RANK
                        node rank for distributed training
  --launcher LAUNCHER   node rank for distributed training
これで、T2I-Adapterが動作することは確認できました。
次は、自分で画像を用意して、プロンプトも変えてみましょう。
input.jpg

プロンプトも変更します。
python -m torch.distributed.launch --nproc_per_node=1 test_sketch.py --plms --auto_resume --prompt "A girl with smile" --path_cond examples/sketch/input.jpg --ckpt models/anything-v4.0-pruned.ckpt --type_in image
このコマンドを実行した結果、「experiments」ディレクトリは次のようになっています。
.
├── test_sketch
└── test_sketch_archived_20230218_101807
「test_sketch」に最新の結果が入ります。
以前のモノは、アーカイブされていくということですね。
結果は、次のような画像となります。
エッジ検出された画像と生成された画像の一部をピックアップ。

以上、T2I-Adapterの動作確認について説明しました。


