
Demucsは音楽制作から音声認識まで幅広く活躍する音源分離ツールです。
その技術は深層学習(ディープラーニング)に基づいています。
この記事ではDemucsの概要、インストール方法、基本的な使用法を紹介します。
音楽クリエイターや研究者にとって有益な情報が満載です。
本記事の内容
- Demucsとは?
- Demucsのインストール
- Demucsの動作確認
それでは、上記に沿って解説していきます。
Demucsとは?
Demucsは深層学習に基づく音楽ソース分離ツールです。
ボーカルや楽器のトラックを元の音楽ファイルから分離できます。
このツールはPythonで実装されており、PyTorchフレームワークを利用しています。
主な利用用途は、音楽制作やリミックスとなります。
加えて、教育目的でも用いられることがあります。
同じようなツールとして、SpleeterやOpen-Unmixが公開されています。


これらと比較して、Demucsは後発と言えます。
そして、最終リリース日時は新しいです。

他のツールは、2021年のリリースを最後に更新が止まっています。
Demucsのインストール
Demucsのインストールには、次のシステム要件があります。
- Python 3.8以降
- FFmpeg
- SoundFile
Python 3.8以降は、特に問題ないでしょう。
新しいバージョンのPythonをインストールする場合は、以下の記事が参考になります。


FFmpegは、以下が参考になります。


SoundFileについては、以下の記事で解説しています。

上記以外には、PyTorchがシステム要件にあります。
ただ、Demucsをインストールする際に自動的にインストールされます。
では、以下のコマンドを実行します。
pip install demucs
処理が終わるまで、少し待ちましょう。
Linux系なら、これでインストールは完了です。
ただ、Windowsの場合はあと少しだけ作業があります。
Windowsの場合、PyTorchはCPU版がインストールされることになります。

GPU版を利用する場合は、GPU版を上書き(更新)でインストールする必要があります。

今回は、最新版を上書きでインストールします。
pip install -U torch torchvision torchaudio --index-url https://download.pytorch.org/whl/cu121
インストール後、GPU版に更新されていることを確認できます。

これで、Demucsのインストールは完了です。
Demucsの動作確認
Demucsには、以下の利用手段が用意されています。
- コマンドラインツール
- Python API
コマンドラインツールの使い方は、以下で確認できます。
> demucs -h
usage: demucs.separate [-h] [-s SIG | -n NAME] [--repo REPO] [-v] [-o OUT] [--filename FILENAME] [-d DEVICE] [--shifts SHIFTS] [--overlap OVERLAP]
                       [--no-split | --segment SEGMENT] [--two-stems STEM] [--int24 | --float32] [--clip-mode {rescale,clamp}] [--flac | --mp3]
                       [--mp3-bitrate MP3_BITRATE] [--mp3-preset {2,3,4,5,6,7}] [-j JOBS]
                       tracks [tracks ...]

Separate the sources for the given tracks

positional arguments:
  tracks                Path to tracks

options:
  -h, --help            show this help message and exit
  -s SIG, --sig SIG     Locally trained XP signature.
  -n NAME, --name NAME  Pretrained model name or signature. Default is htdemucs.
  --repo REPO           Folder containing all pre-trained models for use with -n.
  -v, --verbose
  -o OUT, --out OUT     Folder where to put extracted tracks. A subfolder with the model name will be created.
  --filename FILENAME   Set the name of output file. Use "{track}", "{trackext}", "{stem}", "{ext}" to use variables of track name without extension, track
                        extension, stem name and default output file extension. Default is "{track}/{stem}.{ext}".
  -d DEVICE, --device DEVICE
                        Device to use, default is cuda if available else cpu
  --shifts SHIFTS       Number of random shifts for equivariant stabilization.Increase separation time but improves quality for Demucs. 10 was used in the
                        original paper.
  --overlap OVERLAP     Overlap between the splits.
  --no-split            Doesn't split audio in chunks. This can use large amounts of memory.
  --segment SEGMENT     Set split size of each chunk. This can help save memory of graphic card.
  --two-stems STEM      Only separate audio into {STEM} and no_{STEM}.
  --int24               Save wav output as 24 bits wav.
  --float32             Save wav output as float32 (2x bigger).
  --clip-mode {rescale,clamp}
                        Strategy for avoiding clipping: rescaling entire signal if necessary (rescale) or hard clipping (clamp).
  --flac                Convert the output wavs to flac.
  --mp3                 Convert the output wavs to mp3.
  --mp3-bitrate MP3_BITRATE
                        Bitrate of converted mp3.
  --mp3-preset {2,3,4,5,6,7}
                        Encoder preset of MP3, 2 for highest quality, 7 for fastest speed. Default is 2
  -j JOBS, --jobs JOBS  Number of jobs. This can increase memory usage but will be much faster when multiple cores are available.
Python APIについては、イマイチ扱いが低いように感じます。
GitHub上の公式ページのトップには、ほぼ情報がありません。
それに、現段階ではPython APIを利用できません。
利用するためには、GitHubからフォルダをダウンロードする必要があります。
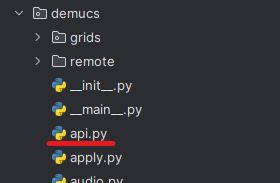
以下のフォルダを取得します。
このディレクトリの中にある「api.py」が、APIとしての利用時に必要となります。
コードは、以下のようになります。
import demucs.api
import os

# 音声ファイルのパスを変数で指定
audio_file_path = "EmCPHumbMvo.m4a"
# ファイル名から拡張子を除いた部分を取得(保存時のファイル名に使用)
audio_file_name = os.path.splitext(os.path.basename(audio_file_path))[0]

# 保存先のフォルダを指定
output_folder = "separated_audio"

# フォルダが存在しない場合は作成
if not os.path.exists(output_folder):
    os.makedirs(output_folder)

# Separatorの初期化(指定されたモデルとセグメントサイズを使用)
separator = demucs.api.Separator(model="mdx_extra", segment=12)

# 音声ファイルを分離
origin, separated = separator.separate_audio_file(audio_file_path)

# 分離した音声を保存
for stem, source in separated.items():
    # 保存先のファイルパスを組み立て
    output_path = os.path.join(output_folder, f"{stem}_{audio_file_name}.mp3")
    # 音声を保存
    demucs.api.save_audio(source, output_path, samplerate=separator.samplerate)
コメントを見れば、内容はわかるでしょう。
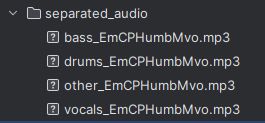
上記コードを実行した結果、次のように音声ファイルが保存されています。
なお、指定可能なモデルは次の中から選択できます。
htdemucs: Hybrid Transformer Demucsの最初のバージョン。MusDBと追加の800曲でトレーニングされています。デフォルトモデルであり、バランスの取れた選択肢です。
htdemucs_ft: htdemucsのファインチューニング版。分離には4倍の時間がかかりますが、品質が若干向上する可能性があります。厳密な品質が求められる場合に適しています。
htdemucs_6s: ピアノとギターが追加された6ソースバージョンのhtdemucsです。ただし、ピアノソースの性能は現時点ではあまり良くないとのことです。特定の楽器の分離が必要な場合に選択することがありますが、ピアノについては期待を抑える必要があります。
hdemucs_mmi: MusDBと追加の800曲で再トレーニングされたHybrid Demucs v3です。新しいデータセットでのトレーニングが改善につながっている可能性があります。
mdx: MusDB HQのみでトレーニングされ、MDXチャレンジのトラックAで優勝したモデルです。コンペティションでの実績が高いため、高品質な分離が期待できます。
mdx_extra: MusDBのテストセットを含む追加トレーニングデータでトレーニングされ、MDXチャレンジのトラックBで2位にランクされたモデルです。追加データによるトレーニングは、さらに高い品質の分離を提供する可能性があります。
mdx_q, mdx_extra_q: 前述のモデルの量子化バージョンで、ダウンロードサイズとストレージ要件が小さい一方で、品質は若干劣る場合があります。リソースが限られている場合に適しています。
SIG: 「the model zoo」からの単一モデル。特定のニーズに合わせて選択することができます。
最も高品質なモデルは、「mdx_extra」になります。