「DETRをとにかく動かしたい!!」
「最新の物体検出・物体認識を試したい!!」
このような方に向けた記事となります。
それも、Google Colabを使わずにDETRを動かす方法を解説します。
本記事の内容
- DETRとは?
- DETRのシステム要件
- DETRのインストール
- DETRの動作確認
それでは、上記に沿って解説していきます。
DETRとは?
DETRは、Transformerを採用した物体検出手法です。
最新と言っても、年月とともにまた新たな手法が出てくるでしょうけどね。
また、DETRはFacebook AI Research(FAIR) が2020年5月に公開しています。
その意味でも、今後の可能性を感じるモノになります。
では、Transformerを採用したら何がスゴイのでしょうか?
Transformerの詳細は、機械学習の専門家の説明を見てください。
利用者にとってTransformerがスゴイのは、処理が速くなることです。
とにかく、機械学習においてTransformerは革新的な手法と言えます。
革新的な手法のTransformerを採用した物体検出が、DETRだと言うことです。
次に、DETRのシステム要件を確認します。
DETRのシステム要件
DETRをWindowsやLinuxで動かすためには、最低限で以下が必要となります。
- PyTorch
- Pycocotools
- Scipy
それぞれを説明します。
PyTorch
PyTorchは、機械学習用のライブラリ(フレームワーク)です。
そして、PyTorchもFacebook AI Research(FAIR)によって開発されています。
じゃあ、DETRがPyTorchをベースとするのも納得です。
PyTorchのインストールに関しては、以下の記事を参考にしてください。

Pycocotools
Pycocotoolsは、COCOデータセットを扱うためのパッケージとなります。
COCO公式
https://cocodataset.org
公式ページでは、次のように説明されています。
COCOは、オブジェクト検出、セグメンテーション、およびキャプション生成のための大規模なデータセットです。
よって、物体検出を行う際には必須のデータと言えるでしょう。
そして、COCOデータセットを扱うために用意されたのが、Pycocotoolsということです。
なお、Pycocotoolsのインストールはpipコマンドで一撃です。
pip install pycocotools
Scipy
Scipyは、高度な科学技術計算を行う際に必要となります。
物体検出においても、高度な科学技術計算が必要になります。
まあ、これは機械学習全般に言えることですけどね。
Scipyについては、次の記事にまとめています。
Scipyのインストール方法についても記事内で説明があります。
DETRのシステム要件のまとめ
最低限で、次のパッケージがインストールされていればOKです。
>pip list
Package           Version
----------------- -----------
cycler            0.10.0
Cython            0.29.21
kiwisolver        1.3.1
matplotlib        3.3.3
numpy             1.19.5
Pillow            8.1.0
pip               20.3.3
pycocotools       2.0.2
pyparsing         2.4.7
python-dateutil   2.8.1
scipy             1.6.0
setuptools        51.3.3
six               1.15.0
torch             1.7.1+cu110
torchaudio        0.7.2
torchvision       0.8.2+cu110
typing-extensions 3.7.4.3
PyTorchに関しては、GPU対応版をインストールしています。
なお、DETRはCPUにも対応しています。
そのため、CPU版のPyTorchでも問題ありません。
では、次にDETRのインストールを行います。
DETRのインストール
DETRのインストールといっても、フォルダを設置するだけで済みます。
そのために、まずはモノをダウンロードしましょう。
DETRのGitHubページ
https://github.com/facebookresearch/detr
上記へアクセス。
「Code」ボタンをクリックします。
そして、「Download ZIP」をクリック。
ダウンロードが始まり、適当な場所にファイルを保存します。
保存したzipファイルを解凍したフォルダを「detr」としましょう。
detrフォルダ
DETRのシステム要件を満たしていれば、以上でDETRのインストールは完了です。
PyTorchのインストールも簡単にできるため、ここまではサクサクと進むでしょう。
最後に、DETRの動作確認を行います。
DETRの動作確認
学習済みモデルを利用します。
以下のプログラムでDETRの動作を確認できます。
ただし、1回目は学習済みモデルをダウンロードします。
そのため、時間がかかります。
2回目以降は、モデルをダウンロードする時間を省けます。
from PIL import Image
import requests
import matplotlib.pyplot as plt
import torch
from torch import nn
from torchvision.models import resnet50
import torchvision.transforms as T
torch.set_grad_enabled(False)

IMG_PATH = 'https://free-designer.net/design_img/0325054005.jpg'

class DETRdemo(nn.Module):
    """
    Demo DETR implementation.

    Demo implementation of DETR in minimal number of lines, with the
    following differences wrt DETR in the paper:
    * learned positional encoding (instead of sine)
    * positional encoding is passed at input (instead of attention)
    * fc bbox predictor (instead of MLP)
    The model achieves ~40 AP on COCO val5k and runs at ~28 FPS on Tesla V100.
    Only batch size 1 supported.
    """

    def __init__(self, num_classes, hidden_dim=256, nheads=8,
                 num_encoder_layers=6, num_decoder_layers=6):
        super().__init__()

        # create ResNet-50 backbone
        self.backbone = resnet50()
        del self.backbone.fc

        # create conversion layer
        self.conv = nn.Conv2d(2048, hidden_dim, 1)

        # create a default PyTorch transformer
        self.transformer = nn.Transformer(
            hidden_dim, nheads, num_encoder_layers, num_decoder_layers)

        # prediction heads, one extra class for predicting non-empty slots
        # note that in baseline DETR linear_bbox layer is 3-layer MLP
        self.linear_class = nn.Linear(hidden_dim, num_classes + 1)
        self.linear_bbox = nn.Linear(hidden_dim, 4)

        # output positional encodings (object queries)
        self.query_pos = nn.Parameter(torch.rand(100, hidden_dim))

        # spatial positional encodings
        # note that in baseline DETR we use sine positional encodings
        self.row_embed = nn.Parameter(torch.rand(50, hidden_dim // 2))
        self.col_embed = nn.Parameter(torch.rand(50, hidden_dim // 2))

    def forward(self, inputs):
        # propagate inputs through ResNet-50 up to avg-pool layer
        x = self.backbone.conv1(inputs)
        x = self.backbone.bn1(x)
        x = self.backbone.relu(x)
        x = self.backbone.maxpool(x)

        x = self.backbone.layer1(x)
        x = self.backbone.layer2(x)
        x = self.backbone.layer3(x)
        x = self.backbone.layer4(x)

        # convert from 2048 to 256 feature planes for the transformer
        h = self.conv(x)

        # construct positional encodings
        H, W = h.shape[-2:]
        pos = torch.cat([
            self.col_embed[:W].unsqueeze(0).repeat(H, 1, 1),
            self.row_embed[:H].unsqueeze(1).repeat(1, W, 1),
        ], dim=-1).flatten(0, 1).unsqueeze(1)

        # propagate through the transformer
        h = self.transformer(pos + 0.1 * h.flatten(2).permute(2, 0, 1),
                             self.query_pos.unsqueeze(1)).transpose(0, 1)

        # finally project transformer outputs to class labels and bounding boxes
        return {'pred_logits': self.linear_class(h),
                'pred_boxes': self.linear_bbox(h).sigmoid()}


detr = DETRdemo(num_classes=91)
state_dict = torch.hub.load_state_dict_from_url(
    url='https://dl.fbaipublicfiles.com/detr/detr_demo-da2a99e9.pth',
    map_location='cpu', check_hash=True)
detr.load_state_dict(state_dict)
detr.eval()

# COCO classes
CLASSES = [
    'N/A', 'person', 'bicycle', 'car', 'motorcycle', 'airplane', 'bus',
    'train', 'truck', 'boat', 'traffic light', 'fire hydrant', 'N/A',
    'stop sign', 'parking meter', 'bench', 'bird', 'cat', 'dog', 'horse',
    'sheep', 'cow', 'elephant', 'bear', 'zebra', 'giraffe', 'N/A', 'backpack',
    'umbrella', 'N/A', 'N/A', 'handbag', 'tie', 'suitcase', 'frisbee', 'skis',
    'snowboard', 'sports ball', 'kite', 'baseball bat', 'baseball glove',
    'skateboard', 'surfboard', 'tennis racket', 'bottle', 'N/A', 'wine glass',
    'cup', 'fork', 'knife', 'spoon', 'bowl', 'banana', 'apple', 'sandwich',
    'orange', 'broccoli', 'carrot', 'hot dog', 'pizza', 'donut', 'cake',
    'chair', 'couch', 'potted plant', 'bed', 'N/A', 'dining table', 'N/A',
    'N/A', 'toilet', 'N/A', 'tv', 'laptop', 'mouse', 'remote', 'keyboard',
    'cell phone', 'microwave', 'oven', 'toaster', 'sink', 'refrigerator', 'N/A',
    'book', 'clock', 'vase', 'scissors', 'teddy bear', 'hair drier',
    'toothbrush'
]

# colors for visualization
COLORS = [[0.000, 0.447, 0.741], [0.850, 0.325, 0.098], [0.929, 0.694, 0.125],
          [0.494, 0.184, 0.556], [0.466, 0.674, 0.188], [0.301, 0.745, 0.933]]

# standard PyTorch mean-std input image normalization
transform = T.Compose([
    T.Resize(800),
    T.ToTensor(),
    T.Normalize([0.485, 0.456, 0.406], [0.229, 0.224, 0.225])
])

# for output bounding box post-processing
def box_cxcywh_to_xyxy(x):
    x_c, y_c, w, h = x.unbind(1)
    b = [(x_c - 0.5 * w), (y_c - 0.5 * h),
         (x_c + 0.5 * w), (y_c + 0.5 * h)]
    return torch.stack(b, dim=1)

def rescale_bboxes(out_bbox, size):
    img_w, img_h = size
    b = box_cxcywh_to_xyxy(out_bbox)
    b = b * torch.tensor([img_w, img_h, img_w, img_h], dtype=torch.float32)
    return b

def detect(im, model, transform):
    # mean-std normalize the input image (batch-size: 1)
    img = transform(im).unsqueeze(0)

    # demo model only support by default images with aspect ratio between 0.5 and 2
    # if you want to use images with an aspect ratio outside this range
    # rescale your image so that the maximum size is at most 1333 for best results
    assert img.shape[-2] <= 1600 and img.shape[-1] <= 1600, 'demo model only supports images up to 1600 pixels on each side'

    # propagate through the model
    outputs = model(img)

    # keep only predictions with 0.7+ confidence
    probas = outputs['pred_logits'].softmax(-1)[0, :, :-1]
    keep = probas.max(-1).values > 0.7

    # convert boxes from [0; 1] to image scales
    bboxes_scaled = rescale_bboxes(outputs['pred_boxes'][0, keep], im.size)
    return probas[keep], bboxes_scaled

url = IMG_PATH
im = Image.open(requests.get(url, stream=True).raw)

scores, boxes = detect(im, detr, transform)


def plot_results(pil_img, prob, boxes):
    plt.figure(figsize=(16, 10))
    plt.imshow(pil_img)
    ax = plt.gca()
    for p, (xmin, ymin, xmax, ymax), c in zip(prob, boxes.tolist(), COLORS * 100):
        ax.add_patch(plt.Rectangle((xmin, ymin), xmax - xmin, ymax - ymin,
                                   fill=False, color=c, linewidth=3))
        cl = p.argmax()
        text = f'{CLASSES[cl]}: {p[cl]:0.2f}'
        ax.text(xmin, ymin, text, fontsize=15,
                bbox=dict(facecolor='yellow', alpha=0.5))
    plt.axis('off')
    plt.show()

plot_results(im, scores, boxes)
上記を実行すると、以下の画像が表示されます。
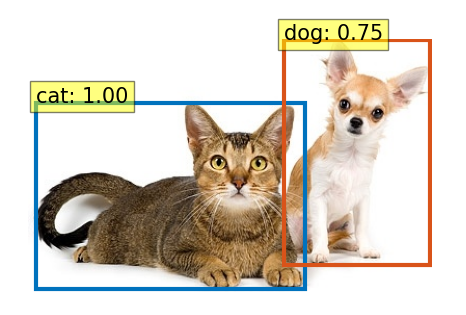
猫と犬の物体検知ができています。
チワワの方は、若干自信がない(0.75)ようですけど・・・
画像を変更する場合は、以下の値を変更します。
IMG_PATH = 'https://free-designer.net/design_img/0325054005.jpg'
以上、DETRの動作確認でした。