
「Pythonで3Dデータを扱いたい」
「Pythonで高速に3D画像を処理したい」
「3Dデータを用いた機械学習を試したい」
このような場合には、Open3Dがオススメです。
この記事では、Open3Dについて解説しています。
本記事の内容
- Open3Dとは?
- Open3Dのシステム要件
- Open3Dのインストール
- Open3Dの動作確認
それでは、上記に沿って解説していきます。
Open3Dとは?
Open3Dとは、3Dデータを扱うオープンソースのPythonライブラリです。
Open3Dの特徴は、以下が公式で主張されています。
- 3D data structures
- 3D data processing algorithms
- Scene reconstruction
- Surface alignment
- 3D visualization
- Physically based rendering (PBR)
- 3D machine learning support with PyTorch and TensorFlow
- GPU acceleration for core 3D operations
- Available in C++ and Python
英語のままの方が、わかりやす部分があるでしょう。
「Surface alignment」なんて、対応する日本語がありません。
上記の特徴は要するに、次のことを言っています。
- PythonとC++から操作が可能
- 物理ベースレンダリングによるリアルな3D表現
- 3D機械学習への対応
- GPUによる処理の高速化
まさに時代が求めている機能です。
Open3Dは、今後メタバース関連での利用が進むかもしれませんね。
以上、Open3Dのついて説明しました。
次は、Open3Dのシステム要件を確認します。
Open3Dのシステム要件
現時点(2022年2月)でのOpen3Dの最新バージョンは、0.14.1となります。
この最新バージョンは、2021年12月3日にリリースされています。
サポートOSに関しては、以下を含むクロスプラットフォーム対応です。
- Windows
- macOS
- Linux
サポート対象となるPythonのバージョンは、以下となっています。
- Python 3.6
- Python 3.7
- Python 3.8
- Python 3.9
通常、Python 3.6で動けば、それ以降のバージョンでも動きます。
今だと、Python 3.10系が最新バージョンです。


そのため、次のバージョンでもインストールは可能だと考えます。
$ python -V
Python 3.10.2
しかし、上記のPythonバージョンだとインストールでエラーが出てしまいます。
ERROR: Could not find a version that satisfies the requirement open3d (from versions: none)
ERROR: No matching distribution found for open3d
Pythonライブラリについては、多くのライブラリをインストールしてきました。
しかし、このようなケースはかなり珍しいです。
Open3Dは、Pythonのバージョンをかなり厳格に見ているということでしょう。
でも、それなら次のPython公式開発サイクルには対応して欲しいですね。
| バージョン | リリース日 | サポート期限 |
| 3.6 | 2016年12月23日 | 2021年12月23日 |
| 3.7 | 2018年6月27日 | 2023年6月27日 |
| 3.8 | 2019年10月14日 | 2024年10月 |
| 3.9 | 2020年10月5日 | 2025年10月 |
| 3.10 | 2021年10月4日 | 2026年10月 |
ここは、次の最新バージョンに期待しておきましょう。
とにかく、Pythonのバージョンには従う必要があるということです。
以上、Open3Dのシステム要件を説明しました。
次は、Open3Dのインストールを行います。
Open3Dのインストール
検証は、次のバージョンのPythonで行います。
$ python -V
Python 3.8.10
また、公式ではPython仮想環境へのインストールが推奨されています。
後述していますが、依存パッケージが数がかなり多いです。
Python仮想環境については、次の記事でまとめています。

まずは、現状のインストール済みパッケージを確認しておきます。
$ pip list
Package    Version
---------- -------
pip        22.0.3
setuptools 60.8.1
wheel      0.36.2
次にするべきことは、pipとsetuptoolsの更新です。
pipコマンドを使う場合、常に以下のコマンドを実行しておきましょう。
python -m pip install --upgrade pip setuptools
では、Open3Dのインストールです。
Open3Dのインストールは、以下のコマンドとなります。
pip install open3d
インストールには、かなりの時間がかかります。
焦らずに気長に待ちましょう。
終了したら、どんなパッケージがインストールされたのかを確認します。
$ pip list
Package              Version
-------------------- ---------
addict               2.4.0
anyio                3.5.0
argon2-cffi          21.3.0
argon2-cffi-bindings 21.2.0
asttokens            2.0.5
attrs                21.4.0
Babel                2.9.1
backcall             0.2.0
black                22.1.0
bleach               4.1.0
certifi              2021.10.8
cffi                 1.15.0
charset-normalizer   2.0.11
click                8.0.3
cycler               0.11.0
debugpy              1.5.1
decorator            5.1.1
defusedxml           0.7.1
deprecation          2.1.0
entrypoints          0.4
executing            0.8.2
fonttools            4.29.1
idna                 3.3
importlib-resources  5.4.0
ipykernel            6.8.0
ipython              8.0.1
ipython-genutils     0.2.0
ipywidgets           7.6.5
jedi                 0.18.1
Jinja2               3.0.3
joblib               1.1.0
json5                0.9.6
jsonschema           4.4.0
jupyter-client       7.1.2
jupyter-core         4.9.1
jupyter-packaging    0.11.1
jupyter-server       1.13.5
jupyterlab           3.2.9
jupyterlab-pygments  0.1.2
jupyterlab-server    2.10.3
jupyterlab-widgets   1.0.2
kiwisolver           1.3.2
MarkupSafe           2.0.1
matplotlib           3.5.1
matplotlib-inline    0.1.3
mistune              0.8.4
mypy-extensions      0.4.3
nbclassic            0.3.5
nbclient             0.5.10
nbconvert            6.4.1
nbformat             5.1.3
nest-asyncio         1.5.4
notebook             6.4.8
numpy                1.22.2
open3d               0.14.1
packaging            21.3
pandas               1.4.0
pandocfilters        1.5.0
parso                0.8.3
pathspec             0.9.0
pexpect              4.8.0
pickleshare          0.7.5
Pillow               9.0.1
pip                  22.0.3
platformdirs         2.4.1
prometheus-client    0.13.1
prompt-toolkit       3.0.26
ptyprocess           0.7.0
pure-eval            0.2.2
pycparser            2.21
Pygments             2.11.2
pyparsing            3.0.7
pyrsistent           0.18.1
python-dateutil      2.8.2
pytz                 2021.3
PyYAML               6.0
pyzmq                22.3.0
requests             2.27.1
scikit-learn         1.0.2
scipy                1.8.0
Send2Trash           1.8.0
setuptools           60.8.1
six                  1.16.0
sniffio              1.2.0
stack-data           0.1.4
terminado            0.13.1
testpath             0.5.0
threadpoolctl        3.1.0
tomli                2.0.0
tomlkit              0.9.0
tornado              6.1
tqdm                 4.62.3
traitlets            5.1.1
typing_extensions    4.0.1
urllib3              1.26.8
wcwidth              0.2.5
webencodings         0.5.1
websocket-client     1.2.3
wheel                0.36.2
widgetsnbextension   3.5.2
zipp                 3.7.0
過去最高レベルのパッケージ数かもしれません。
それほど、Open3Dには依存関係のあるパッケージが多いということです。
すでに述べましたが、やはりPython仮想環境を利用すべきでしょうね。
おそらく、既存環境への導入はかなりハードルが高いはずです。
なお、インストールの確認は次のコマンドで可能です。
公式では、この確認方法が記載されています。
python -c "import open3d as o3d"
何もエラーが出なければ、Open3Dのインストールは成功です。
エラーが出た場合は、次のコマンドで詳細を確認することになります。
python -W default -c "import open3d as o3d"
以上、Open3Dのインストールを説明しました。
次は、Open3Dの動作確認を行います。
Open3Dの動作確認
サンプルは、以下で公開されています。
https://github.com/isl-org/Open3D/tree/master/examples/python
その中から、シンプルなコードを選びます。
visualization/line_width.py
import open3d as o3d
import random

NUM_LINES = 10


def random_point():
    return [5 * random.random(), 5 * random.random(), 5 * random.random()]


def main():
    pts = [random_point() for _ in range(0, 2 * NUM_LINES)]
    line_indices = [[2 * i, 2 * i + 1] for i in range(0, NUM_LINES)]
    colors = [[0.0, 0.0, 0.0] for _ in range(0, NUM_LINES)]

    lines = o3d.geometry.LineSet()
    lines.points = o3d.utility.Vector3dVector(pts)
    lines.lines = o3d.utility.Vector2iVector(line_indices)
    # The default color of the lines is white, which will be invisible on the
    # default white background. So we either need to set the color of the lines
    # or the base_color of the material.
    lines.colors = o3d.utility.Vector3dVector(colors)

    # Some platforms do not require OpenGL implementations to support wide lines,
    # so the renderer requires a custom shader to implement this: "unlitLine".
    # The line_width field is only used by this shader; all other shaders ignore
    # it.
    mat = o3d.visualization.rendering.MaterialRecord()
    mat.shader = "unlitLine"
    mat.line_width = 10  # note that this is scaled with respect to pixels,
    # so will give different results depending on the
    # scaling values of your system
    o3d.visualization.draw({
        "name": "lines",
        "geometry": lines,
        "material": mat
    })


if __name__ == "__main__":
    main()
上記コードを実行すると、次のような画面が表示されます。
環境によっては、時間がかかる場合もあるでしょう。
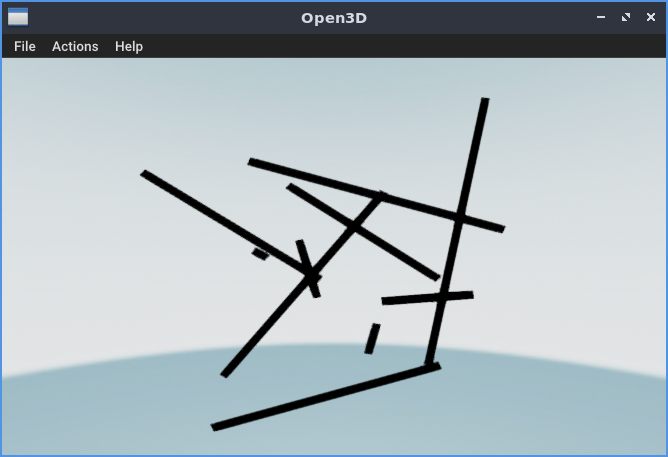
画面内をマウスでグリグリと動かすことが可能です。
単純なコードですが、ちゃんとした3Dが表示されています。
これで、Open3Dの動作確認としては十分でしょう。
あとは、サンプルをダウンロードして見ていくだけです。
習うより慣れろの精神でサンプルコードを漁っていきましょう。
以上、Open3Dの動作確認を説明しました。