「dlibのインストールに失敗してしまう・・」
このような場合には、この記事の内容が参考になります。
この記事では、dlibをインストールする方法を解説しています。
本記事の内容
- dlibとは?
- dlibのシステム要件
- dlibのインストール
- dlibの動作確認
それでは、上記に沿って解説していきます。
dlibとは?
Dlibとは、機械学習・データ解析アプリケーションを作成するためのツールキットのことです。
Dlib自体は、C++で開発されています。
そして、Dlibは以下の二つの言語に対応しています。
- C++
- Python
C++は当然として、Pythonにも対応しています。
Python用に公開しているライブラリは、本体のDlibと区別してdlibと呼びましょう。
機械学習と言えば、Pythonですよね。
その影響からか、「Dlib」とGitHubで検索すると次のような結果になっています。
(2022年10月16日現在)
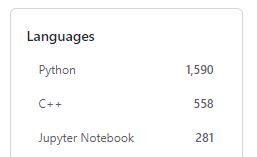
Jypyter Notebookは、Pythonに含めるべきでしょうね。

タグで調べた結果としても、Pythonの方がリポジトリ数が多くなっています。
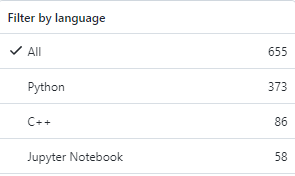
これほどまでに、DlibはPythonで利用されています。
その際に必要となるライブラリが、dlibということです。
以上、dlibについて説明しました。
次は、dlibのシステム要件を説明します。
dlibのシステム要件
現時点(2022年10月)でのdlibの最新バージョンは、19.24.0となります。
この最新バージョンは、2022年5月8日にリリースされています。
dlibのシステム要件では、以下がポイントになります。
- OS
- Pythonバージョン
- CMake
それぞれを以下で説明します。
OS
サポートOSに関しては、以下を含むクロスプラットフォーム対応です。
- Windows
- macOS
- Linux
基本的には、OSは問わないと言えます。
Pythonバージョン
サポート対象となるPythonのバージョンは、以下。
- Python 2.6
- Python 2.7
- Python 3.4
- Python 3.5
- Python 3.6
正直言って、このサポート状況は滅茶苦茶です。
今時、Python 2.6対応なんてなかなか見られません。
Python 3.4対応も、2020年以降では初めて見たかもしれません。
それぐらい、上記のサポートバージョンはあり得ないということです。
救いは、Python 3.6が含まれていることでしょう。
Python 3.6に対応していれば、それ以降のPythonでも基本的には動きます。
一応、Python公式開発サイクルでは次のようになっています。
| バージョン | リリース日 | サポート期限 |
| 3.6 | 2016年12月23日 | 2021年12月23日 |
| 3.7 | 2018年6月27日 | 2023年6月27日 |
| 3.8 | 2019年10月14日 | 2024年10月 |
| 3.9 | 2020年10月5日 | 2025年10月 |
| 3.10 | 2021年10月4日 | 2026年10月 |
Python公式開発サイクルに従うと、Python 3.7以降じゃないとダメということになります。
そういうことで、ここではPython 3.7以降を推奨しておきます。
CMake
dlibのインストール時に、cmakeコマンドが動く必要があります。
ビルドをその際に行っているということでしょうね。
そのため、CMakeを事前にインストールしておく必要があります。
CMakeのインストールは、OS毎に異なります。
Ubuntuであれば、以下のコマンドでサクッとインストールできます。
sudo apt install cmake
WindowsへのCMakeのインストールは、次の記事で解説しています。

「cmake –version」を実行して、CMakeのバージョンが表示されればOKです。

以上、dlibのシステム要件を説明しました。
次は、dlibのインストールを説明します。
dlibのインストール
検証は、次のバージョンのPythonで行います。
> python -V
Python 3.10.4
まずは、現状のインストール済みパッケージを確認しておきます。
> pip list
Package    Version
---------- -------
pip        22.3
setuptools 65.5.0
wheel      0.37.1
次にするべきことは、pipとsetuptoolsの更新です。
pipコマンドを使う場合、常に以下のコマンドを実行しておきましょう。
python -m pip install --upgrade pip setuptools
では、dlibのインストールです。
dlibのインストールは、以下のコマンドとなります。
pip install dlib
dlibのインストールは、しばらく時間がかかります。
次の表示で止まったままの状態が、数分ほど続きます。
Building wheels for collected packages: dlib
  Building wheel for dlib (setup.py) ... \
cmakeコマンドで何かしらビルドでもしているのでしょう。
処理が終了したら、どんなパッケージがインストールされたのかを確認します。
> pip list
Package    Version
---------- -------
dlib       19.24.0
pip        22.3
setuptools 65.5.0
wheel      0.37.1
dlibには、依存するパッケージがありません。
CMakeさえインストールできれば、dlibの導入は容易にできそうです。
以上、dlibのインストールを説明しました。
次は、dlibの動作確認を説明します。
dlibの動作確認
dlibの動作確認は、以下のコードで行います。
dlibの公式ページにあるサンプルコードをそのまま拝借しています。
#!/usr/bin/python
# The contents of this file are in the public domain. See LICENSE_FOR_EXAMPLE_PROGRAMS.txt
#
#
# This is an example illustrating the use of a binary SVM classifier tool from
# the dlib C++ Library.  In this example, we will create a simple test dataset
# and show how to learn a classifier from it.
#
#
# COMPILING/INSTALLING THE DLIB PYTHON INTERFACE
#   You can install dlib using the command:
#       pip install dlib
#
#   Alternatively, if you want to compile dlib yourself then go into the dlib
#   root folder and run:
#       python setup.py install
#
#   Compiling dlib should work on any operating system so long as you have
#   CMake installed.  On Ubuntu, this can be done easily by running the
#   command:
#       sudo apt-get install cmake
#

import dlib
try:
    import cPickle as pickle
except ImportError:
    import pickle

x = dlib.vectors()
y = dlib.array()

# Make a training dataset.  Here we have just two training examples.  Normally
# you would use a much larger training dataset, but for the purpose of example
# this is plenty.  For binary classification, the y labels should all be either +1 or -1.
x.append(dlib.vector([1, 2, 3, -1, -2, -3]))
y.append(+1)

x.append(dlib.vector([-1, -2, -3, 1, 2, 3]))
y.append(-1)


# Now make a training object.  This object is responsible for turning a
# training dataset into a prediction model.  This one here is a SVM trainer
# that uses a linear kernel.  If you wanted to use a RBF kernel or histogram
# intersection kernel you could change it to one of these lines:
#  svm = dlib.svm_c_trainer_histogram_intersection()
#  svm = dlib.svm_c_trainer_radial_basis()
svm = dlib.svm_c_trainer_linear()
svm.be_verbose()
svm.set_c(10)

# Now train the model.  The return value is the trained model capable of making predictions.
classifier = svm.train(x, y)

# Now run the model on our data and look at the results.
print("prediction for first sample:  {}".format(classifier(x[0])))
print("prediction for second sample: {}".format(classifier(x[1])))


# classifier models can also be pickled in the same was as any other python object.
with open('saved_model.pickle', 'wb') as handle:
    pickle.dump(classifier, handle, 2)
上記コードを実行します。
実行後、「saved_model.pickle」が作成されていれば問題ありません。
以上、dlibの動作確認を説明しました。