
「WordPressが重くて困っている・・・」
「PHPが簡単に動く高速なWebサーバーを探している」
このような場合には、このOpenLiteSpeedがオススメです。
この記事では、OpenLiteSpeedについて解説しています。
本記事の内容
- OpenLiteSpeedとは?
- OpenLiteSpeedのインストール
- OpenLiteSpeed用PHPのインストール
- OpenLiteSpeedの動作確認
それでは、上記に沿って解説していきます。
OpenLiteSpeedとは?
OpenLiteSpeedは、LiteSpeed Web Server Enterpriseのオープンソース版です。
機能的にはほ同じであり、まとめてLiteSpeed(ライトスピード)と言います。
LiteSpeedを一言で表すと、高性能なApacheとなります。
実際、LiteSpeedはApacheの代替品を目指しています。
LiteSpeed上でWordPressが動くのは、大きなメリットとなっています。
nginxでWordPressを動かすのは、かなりやっかいですからね。
また、LiteSpeedは第4のWebサーバーと呼ばれることがあります。
第4とは、Apache、IIS、nginx以外の選択肢ということでしょう。
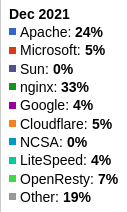
ここで、2021年12月におけるWebサーバーのシェアを確認しましょう。
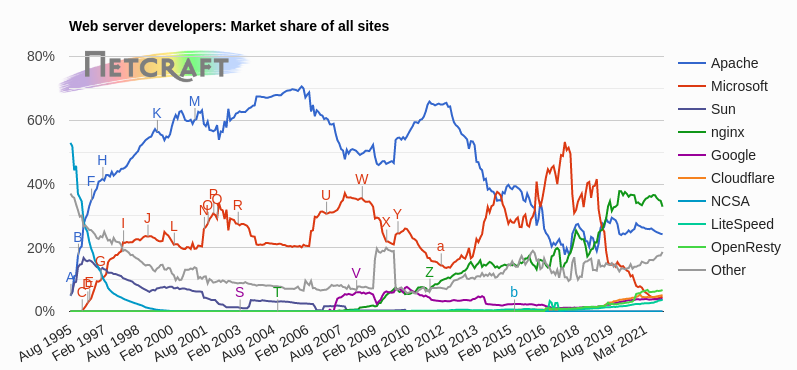
上はシェアの推移ですね。
そして、TOP4は以下。
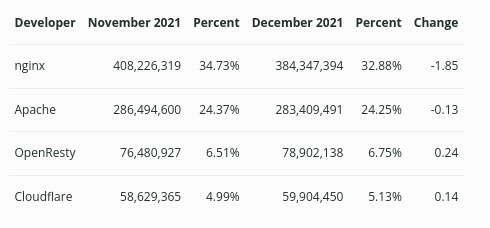
それ以外のシェアはざっくりです。
少なくとも、LiteSpeedが4番目ではないことは明確です。
OpenRestyの方が、上に来ています。
ただ、LiteSpeedもそのシェアを伸ばしています。
上のグラフからは、そのことがわかりにくいですけどね。
以上、OpenLiteSpeedについて説明しました。
次は、OpenLiteSpeedのインストールを説明します。
OpenLiteSpeedのインストール
OpenLiteSpeedのインストールは、次のコマンドを実行するだけです。
このコマンドは、Debian 7, 8, 9, 10 & Ubuntu 14,16,18, 20 がサポート対象となります。
$ sudo wget -O - http://rpms.litespeedtech.com/debian/enable_lst_debian_repo.sh | sudo bash
$ sudo apt-get install -y openlitespeed
単にインストールを実行できるのは、スクリプトのおかげです。
スクリプトにより、リポジトリの追加などが実行されています。
具体的には、以下の処理が行われています。
- /etc/apt/sources.list.d/lst_debian_repo.listの作成
- パッケージの更新
作成されたファイルの内容は、以下。
/etc/apt/sources.list.d/lst_debian_repo.list
deb http://rpms.litespeedtech.com/debian/ focal main
#deb http://rpms.litespeedtech.com/edge/debian/ focal main
通常なら、自分たちでやる必要のあることがスクリプトで一撃です。
このような些細なところに、OpenLiteSpeedを普及させたいという意気込みを感じます。
あと、パッケージを確認しておきます。
OpenLiteSpeed 1.7.14が、インストールされています。
$ sudo apt info openlitespeed
Package: openlitespeed
Version: 1.7.14-2+focal
Priority: optional
Section: web
Maintainer: lsadm <info@litespeedtech.com>
Installed-Size: 31.1 MB
Depends: libc6 (>= 2.10), libcrypt1 (>= 1:4.1.0), rcs, libxml2, openssl, libexpat | libexpat1, lsphp73, lsphp73-common, lsphp73-json, lsphp73-mysql, lsphp73-imap
Homepage: http://www.open.litespeedtech.com
Download-Size: 8,147 kB
APT-Sources: http://rpms.litespeedtech.com/debian focal/main amd64 Packages
Description: High Performance, lightweight, open source HTTP server
 OpenLiteSpeed Web Server is developed and copyrighted by LiteSpeed Technologies.
ちなみに、OpenLiteSpeed 1.7.14は2021年9月8日にリリースされています。
そこそこ新しいバージョンですね。
また、OpenLiteSpeedのバージョンは次のコマンドで確認できます。
$ /usr/local/lsws/bin/lshttpd -v
LiteSpeed/1.7.14 Open
        module versions:
        modgzip 1.1
        cache 1.62
        modinspector 1.1
        uploadprogress 1.1
        mod_security 1.4
 (built: Mon Oct  4 19:06:44 UTC 2021)
        module versions:
        modgzip 1.1
        cache 1.62
        modinspector 1.1
        uploadprogress 1.1
        mod_security 1.4
以上、OpenLiteSpeedのインストールを説明しました。
次は、OpenLiteSpeed用PHPをインストールします。
OpenLiteSpeed用PHPのインストール
OpenLiteSpeedには、専用のPHPが用意されています。
例えば、lsphp73のパッケージ情報は以下のようなものです。
$ sudo apt info lsphp73
Package: lsphp73
Version: 7.3.33-1+focal
Priority: optional
Section: php
Source: php7.3
Maintainer: Debian PHP Maintainers <pkg-php-maint@lists.alioth.debian.org>
・・・
APT-Sources: http://rpms.litespeedtech.com/debian focal/main amd64 Packages
Description: server-side, HTML-embedded scripting language (LSAPI binary)
 This package provides the /usr/local/lsws/bin/lsphp LSAPI interpreter
 built for use in LiteSpeed Web Server (lsws).
・・・
「LiteSpeed」の文字を確認できます。
正確には、LiteSpeed専用のPHPということでしょう。
同じモノをOpenLiteSpeedでも、利用するということです。
では、OpenLiteSpeed用のPHP関連のパッケージをインストールします。
そのコマンドが、以下となります。
$ sudo apt-get install lsphp73 lsphp73-common lsphp73-curl lsphp73-mysql lsphp73-opcache lsphp73-imap lsphp73-opcache
$ sudo ln -sf /usr/local/lsws/lsphp73/bin/lsphp /usr/local/lsws/fcgi-bin/lsphp5
PHP 8をインストールする場合は、「php73」を「php80」に置き換えます。
以上、OpenLiteSpeed用PHPのインストールを説明しました。
次は、OpenLiteSpeedの動作確認を行います。
OpenLiteSpeedの動作確認
OpenLiteSpeedは、次のコマンドで起動します。
$ sudo systemctl start lsws
一般的によくあるコマンドが利用できます。
| start | 起動 |
| stop | 停止 |
| restart | 再起動 |
| status | 状況確認 |
OpenLiteSpeedを起動したら、確認しましょう。
注意点として、OpenLiteSpeedのデフォルトのポートは8088となります。
同一マシン上であれば、以下のURLでアクセスできます。
http://localhost:8088/
別マシンであれば、そのマシンのIPアドレスでアクセスします。
http://192.168.11.25:8088/
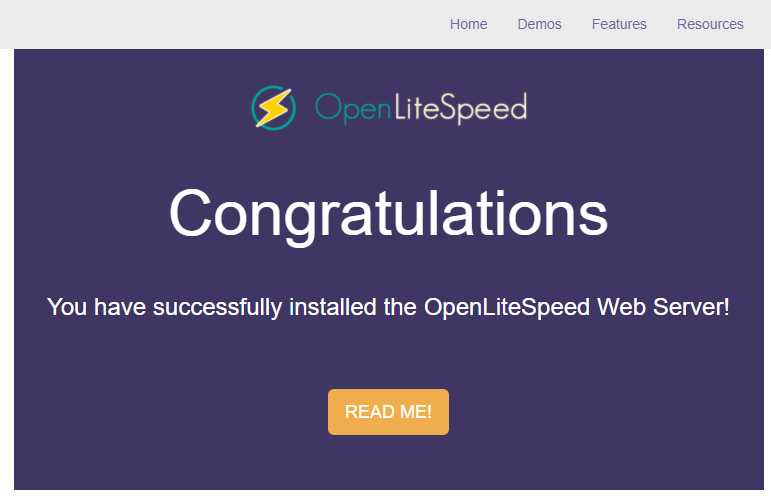
次のような画面が確認できたら、OpenLiteSpeedの動作確認は完了です。
上記画面を確認できない場合は、ポートの解放状況を確認します。
アクセス失敗の原因は、ポート8088が解放されていないことがありえます。
あと、PHPの起動状況も確認しておきます。
同じ画面上に次のような表示を確認できます。
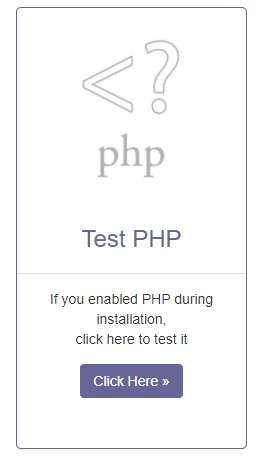
「Click Here」をクリック。
そうすると、別ウィンドウでphpinfoの結果が表示されます。

以上、OpenLiteSpeedの動作確認を説明しました。